- Thread starter
- #1
I installed my new rock sliders today, and it was a bit of a challenge. I will say that installing them solo was completely avoidable; however, hindsight tells me that having a friend help me would have still been quite difficult. If you are fortunate enough to have free access to a vehicle lift, take advantage of it for this job. Since I managed to get it done by myself without a lift, I figured I'd share my experience to anyone here who might be considering doing the same. It can be done... mostly!
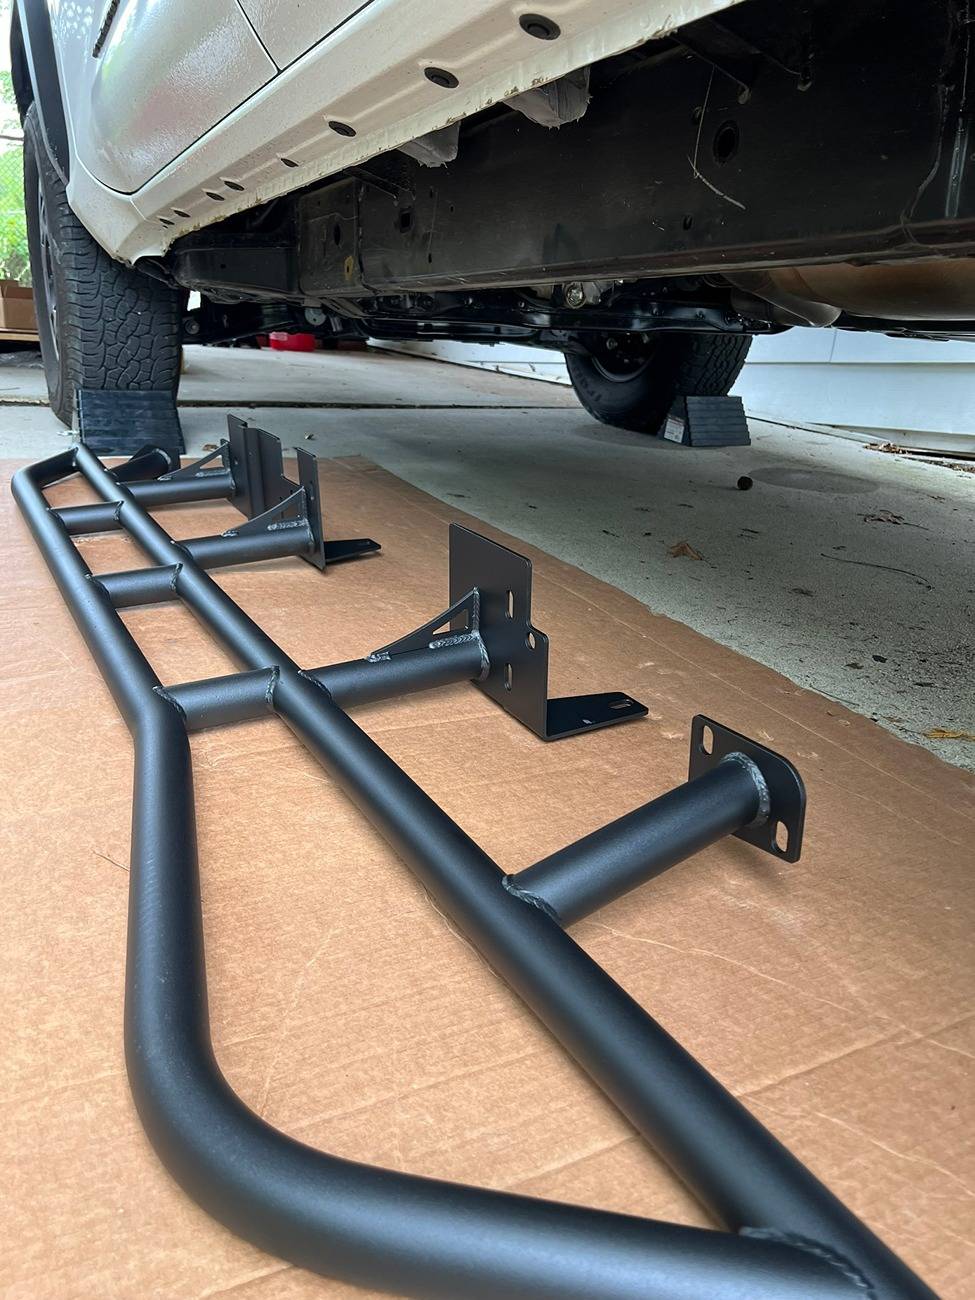
I bought my truck back in May and almost immediately went shopping around for rock sliders. I wanted something that would function as side steps and added protection. There were very few options at the time, but the Cali Raised sliders seemed to fit the bill nicely, so I pulled the trigger on them. About 9 weeks after ordering them, they were delivered. The sliders came very well packed, and after opening and inspecting, everything appeared to be in order. As expected, there were no installation instructions to speak of. Don't bother with the installation guide on their website. No offense intended, but it's actually more confusing trying to follow those instructions than simply trying to figure it out on your own. ? Maybe they will update their installation guide soon?


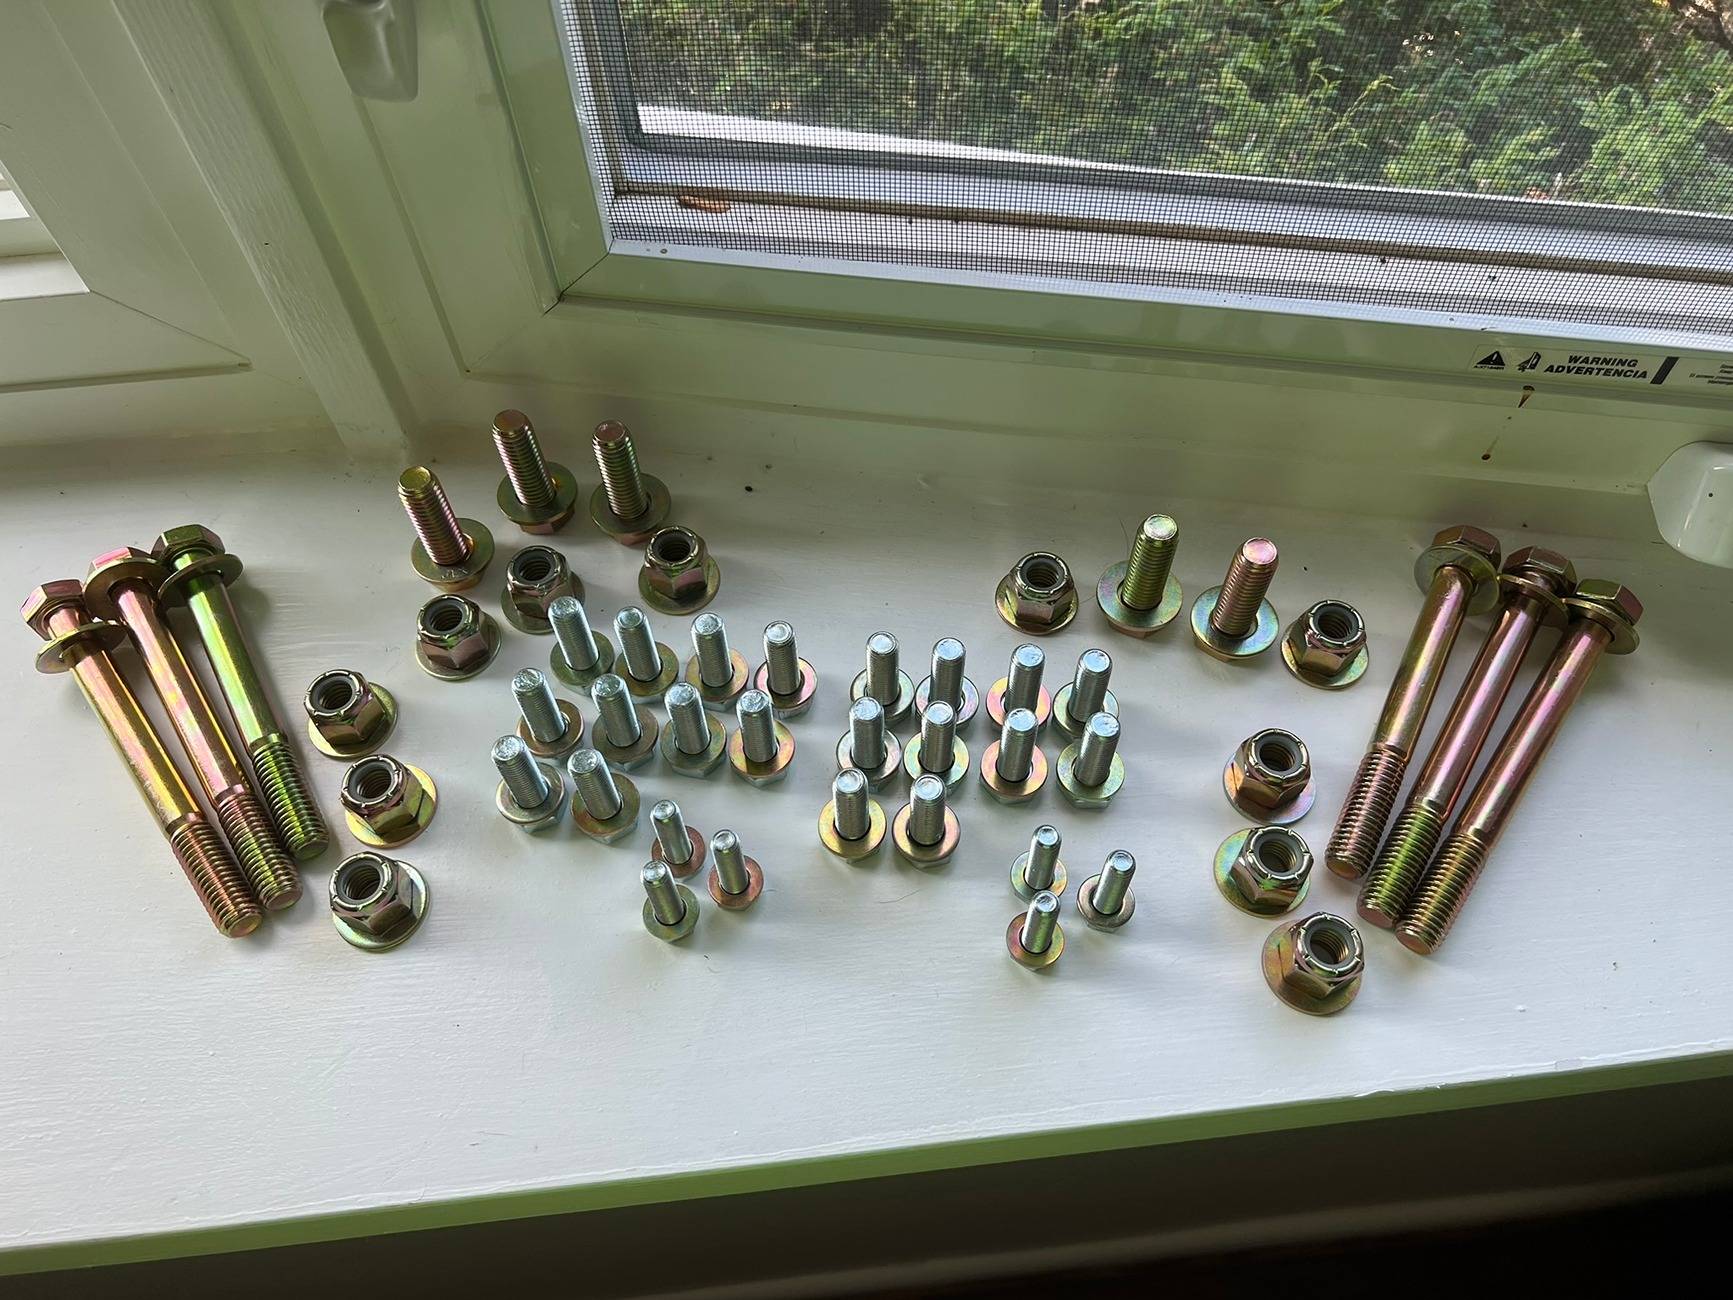
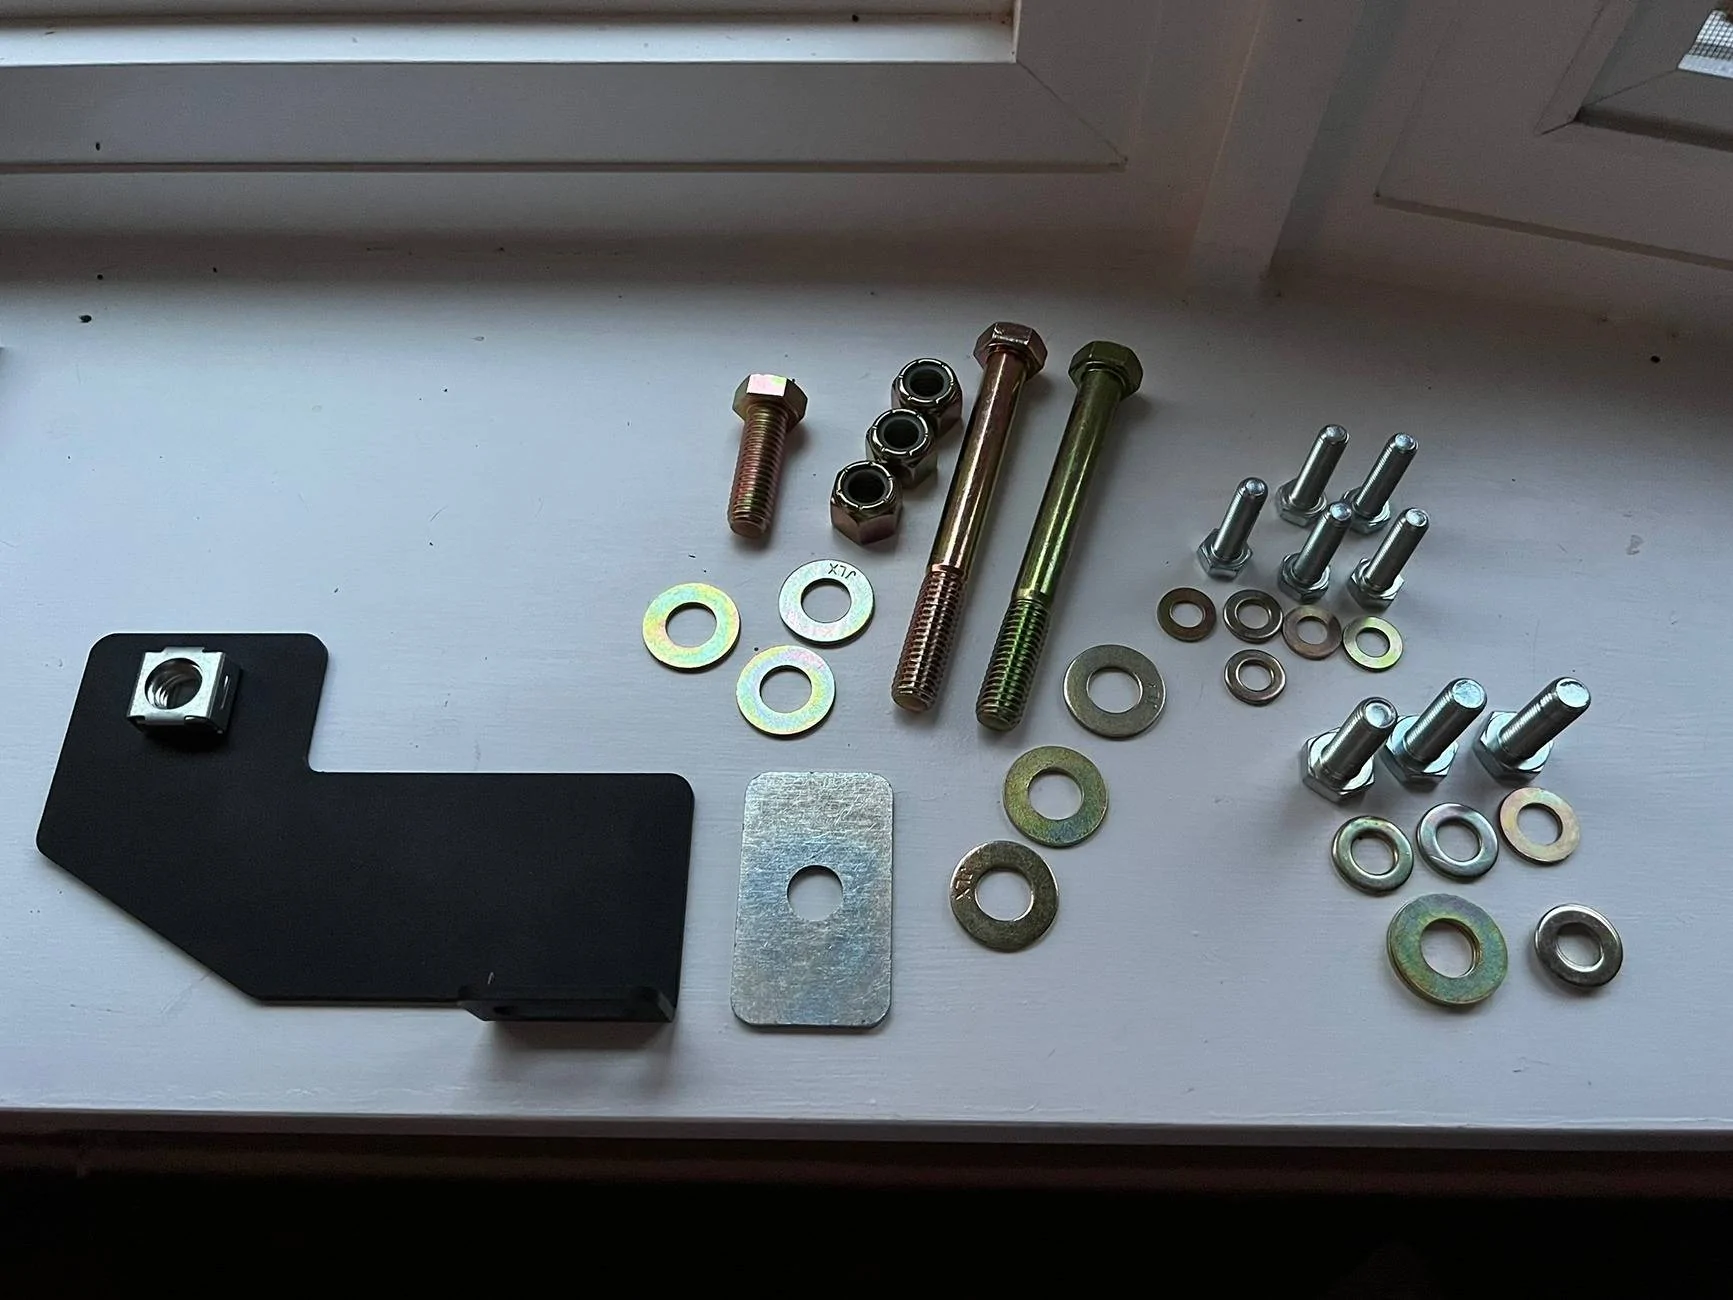
I watched and studied the install video from Cali Raised about a dozen or more times, and noticed a few things. The hardware that I had received with my kit looked different (no big deal) and the quantities of my nuts and bolts was different (slightly concerning, but I was confident that I had enough of what I needed). The video itself was fairly helpful; although, it looked to me like the truck featured in their video is an SR5, and mine is a TRD OR (noted). Here was the hardware that came with my kit:

(4) 1/2" x 5" bolts
(2) 1/2" x 4-1/2" bolts
(5) 1/2" x 1-1/2" bolts
(20) M10 bolts
(6) M8 bolts
(11) 1/2" locking nuts
(1) 1/2" square snap-in nut (not pictured)
(more than enough) washers
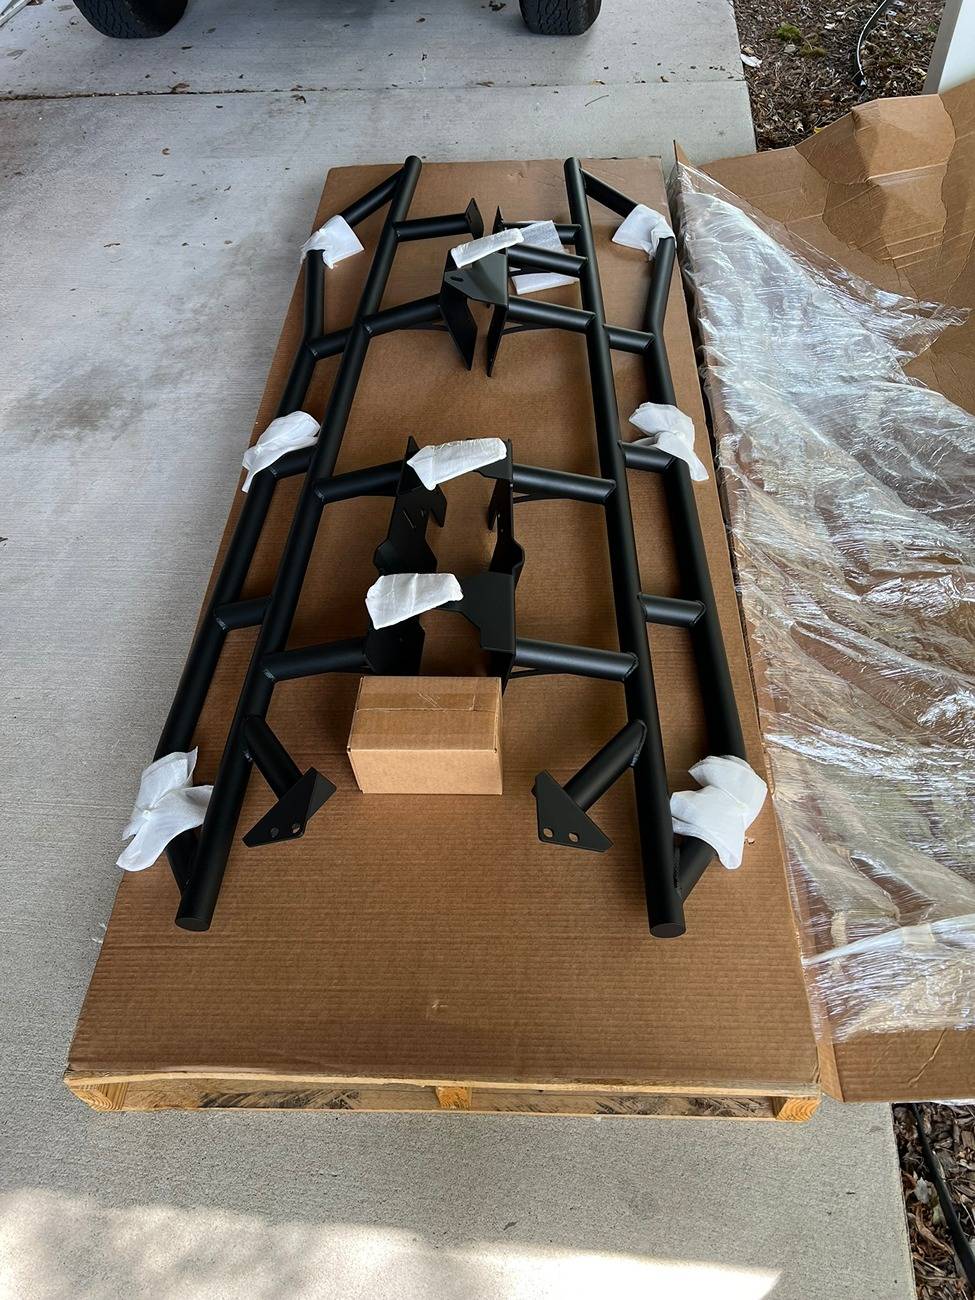
I also received (5) brackets; (4) "L" shaped brackets, and (1) oddly shaped bracket *the same brackets shown in the install video, only mine were powder coated! Sorry, I didn't take pictures of the brackets out of the box. The sliders themselves were powder coated too, as I chose when I originally ordered them. All of the powder coating appeared to be very nicely done. The only other bit of hardware was a single bare-metal "spacer" bracket with a bolt hole in the center.
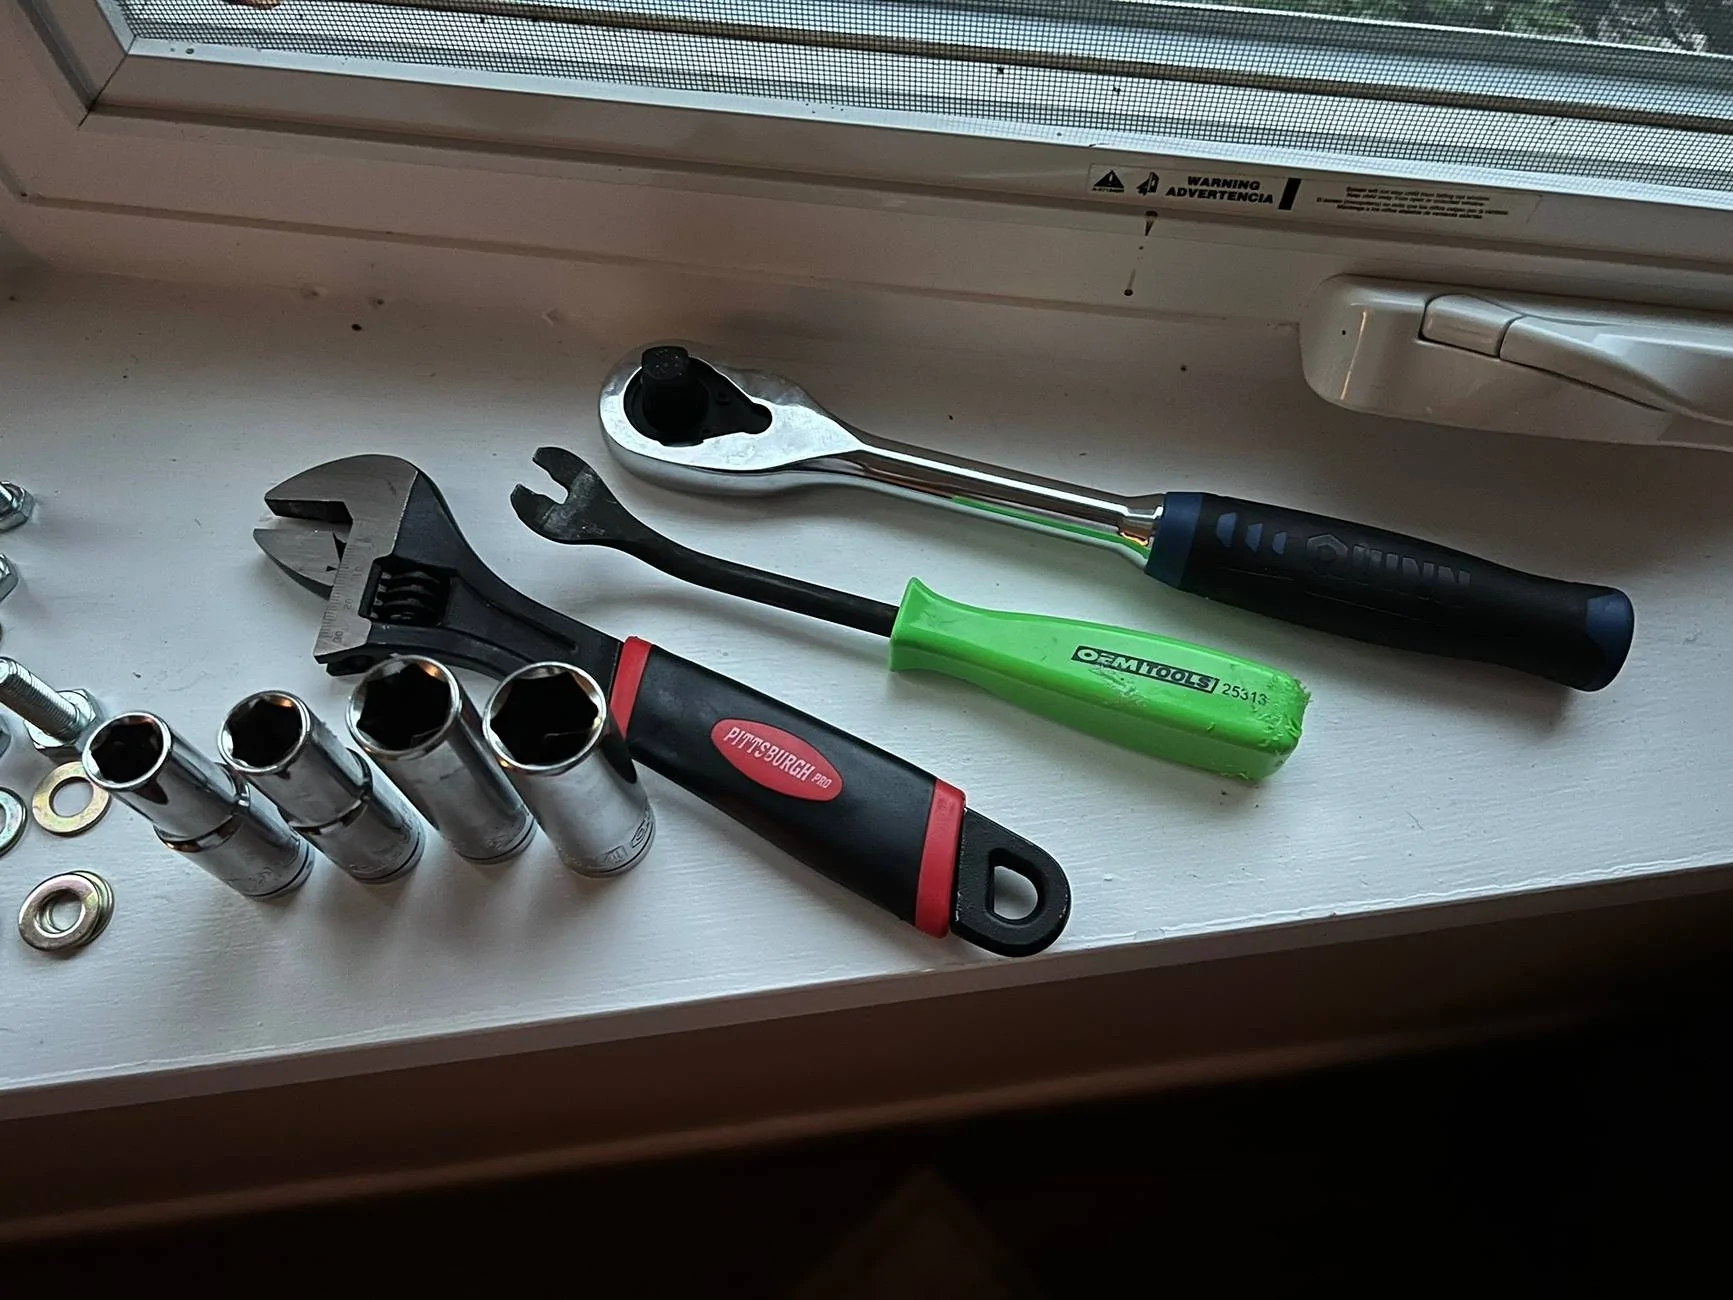
Here are the tools that I used:
1/2" socket wrench
12 mm socket
13 mm socket
17 mm socket
3/4" socket
Adjustable wrench
Pry tool
(I also used various other "tools" when I had to get creative while installing the sliders, but more on that in a bit LOL!
I opted to get my truck elevated as much as I could, and my driveway is at a slight incline. Fortunately, I had some ramps, and of course, wheel chocks (safety first!!!) that I use for doing oil changes. I would definitely recommend lifting the truck a bit higher than it sits normally if you can, but also keep in mind, the higher you lift the truck, the higher you have to lift the rock sliders.
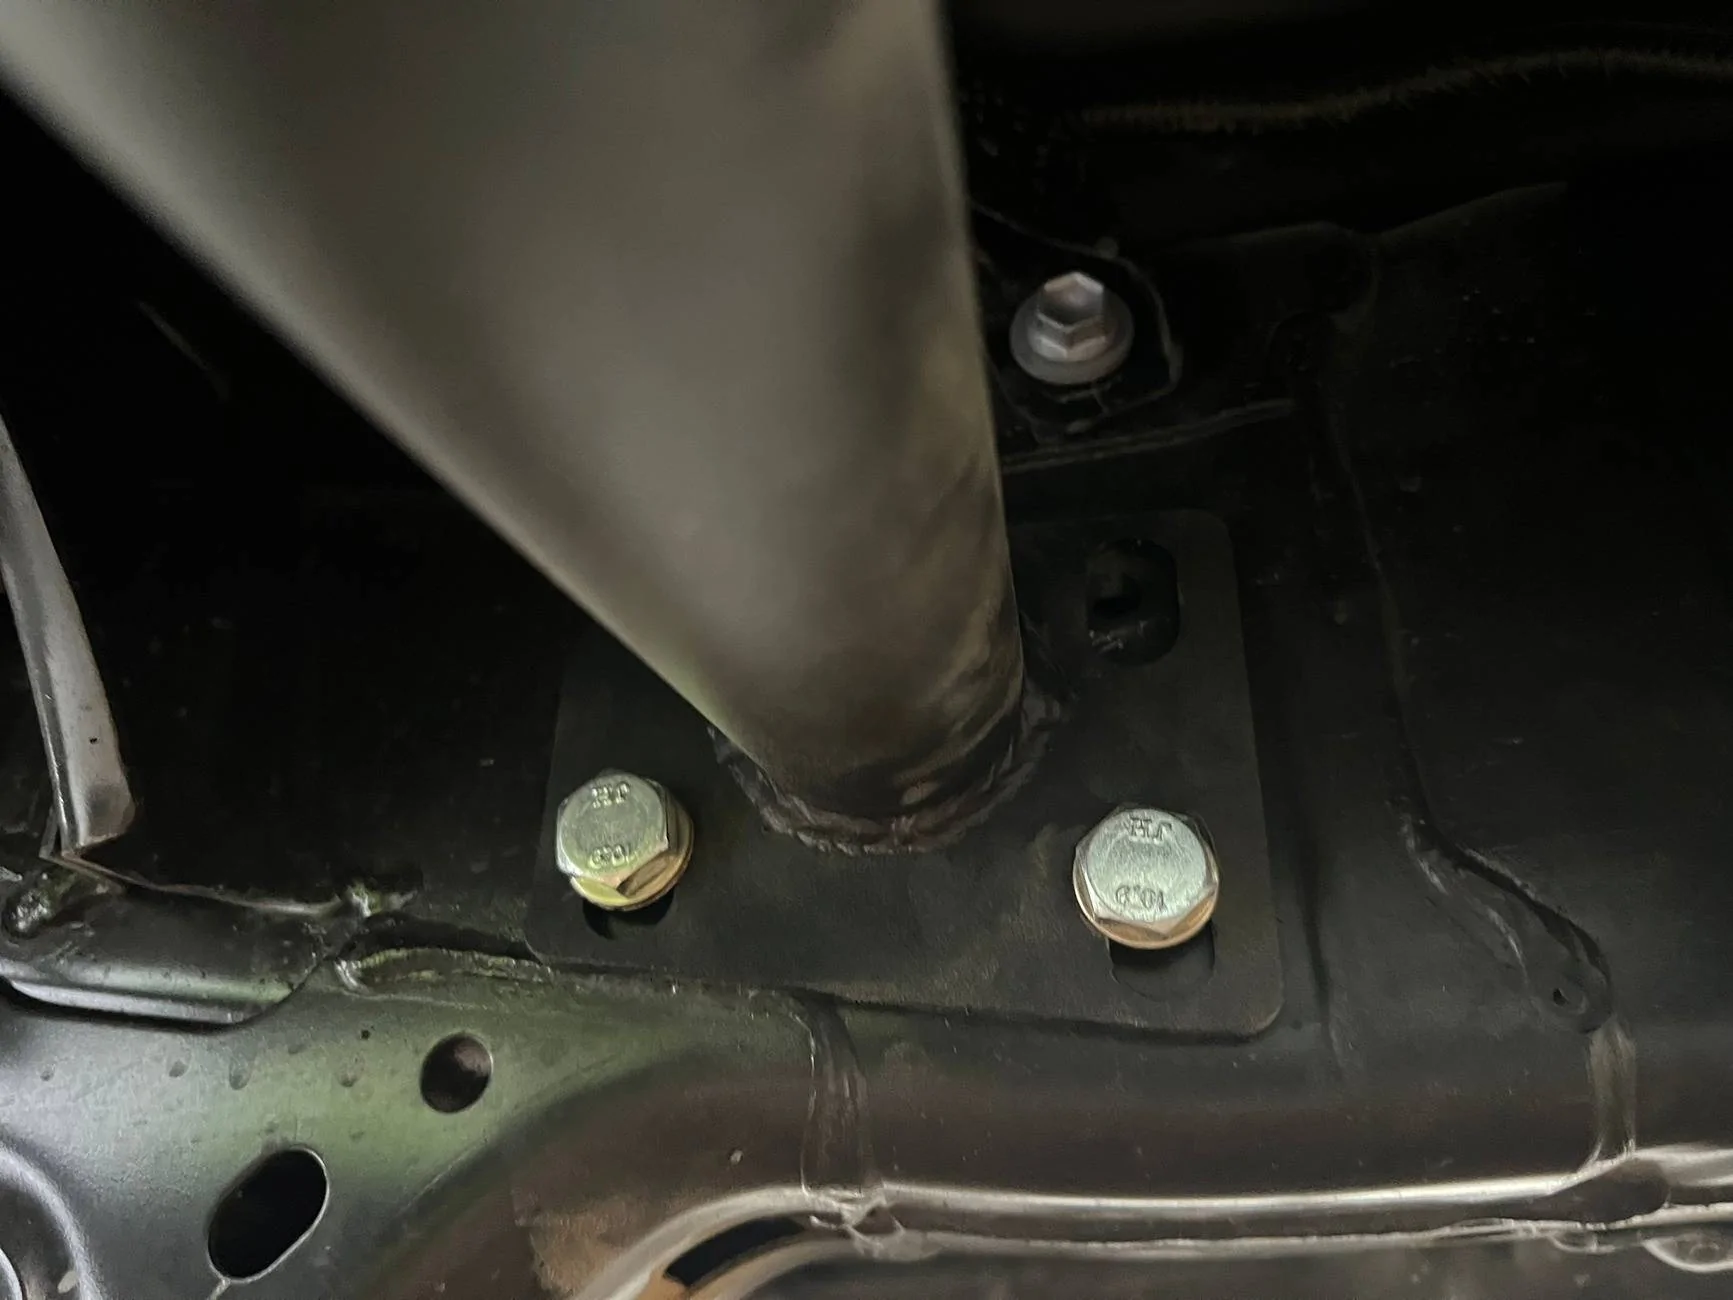
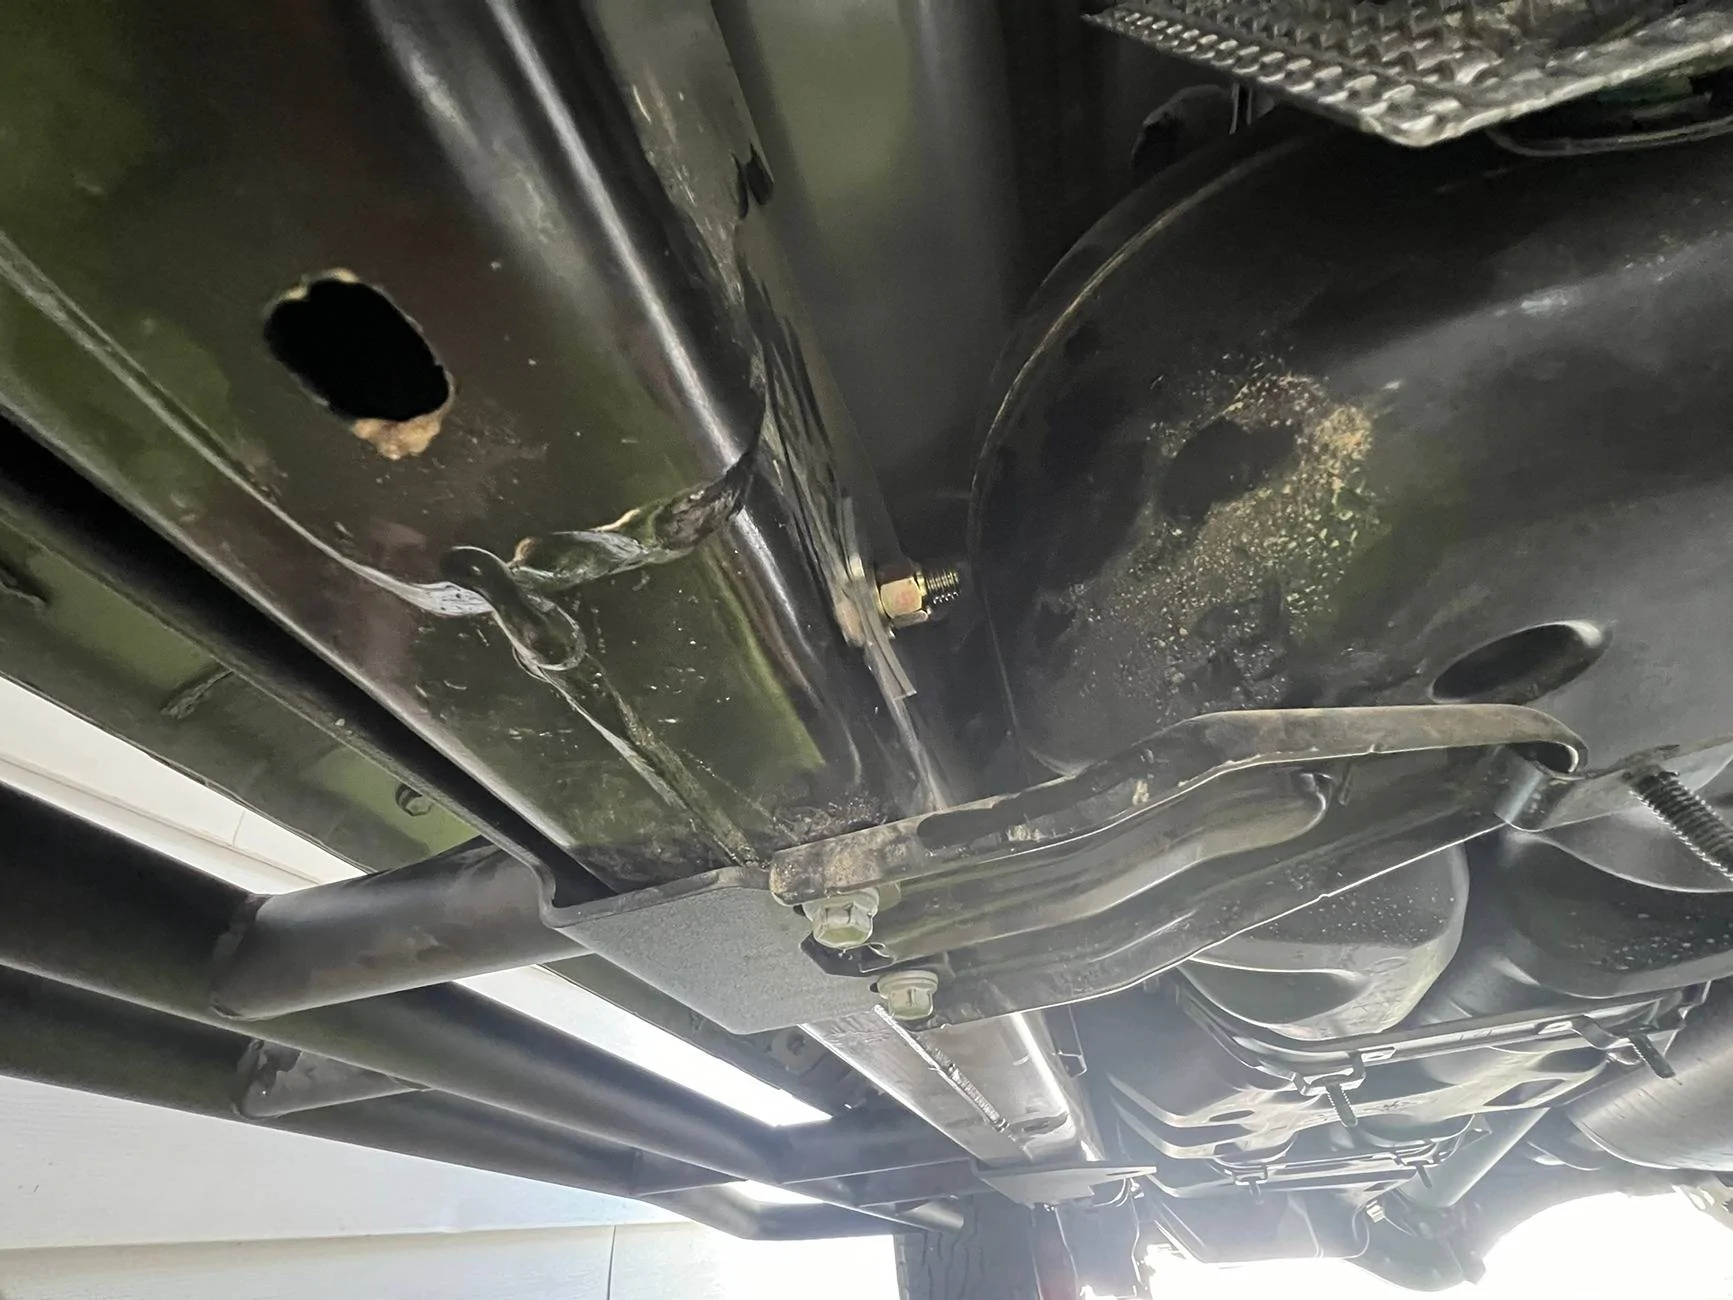
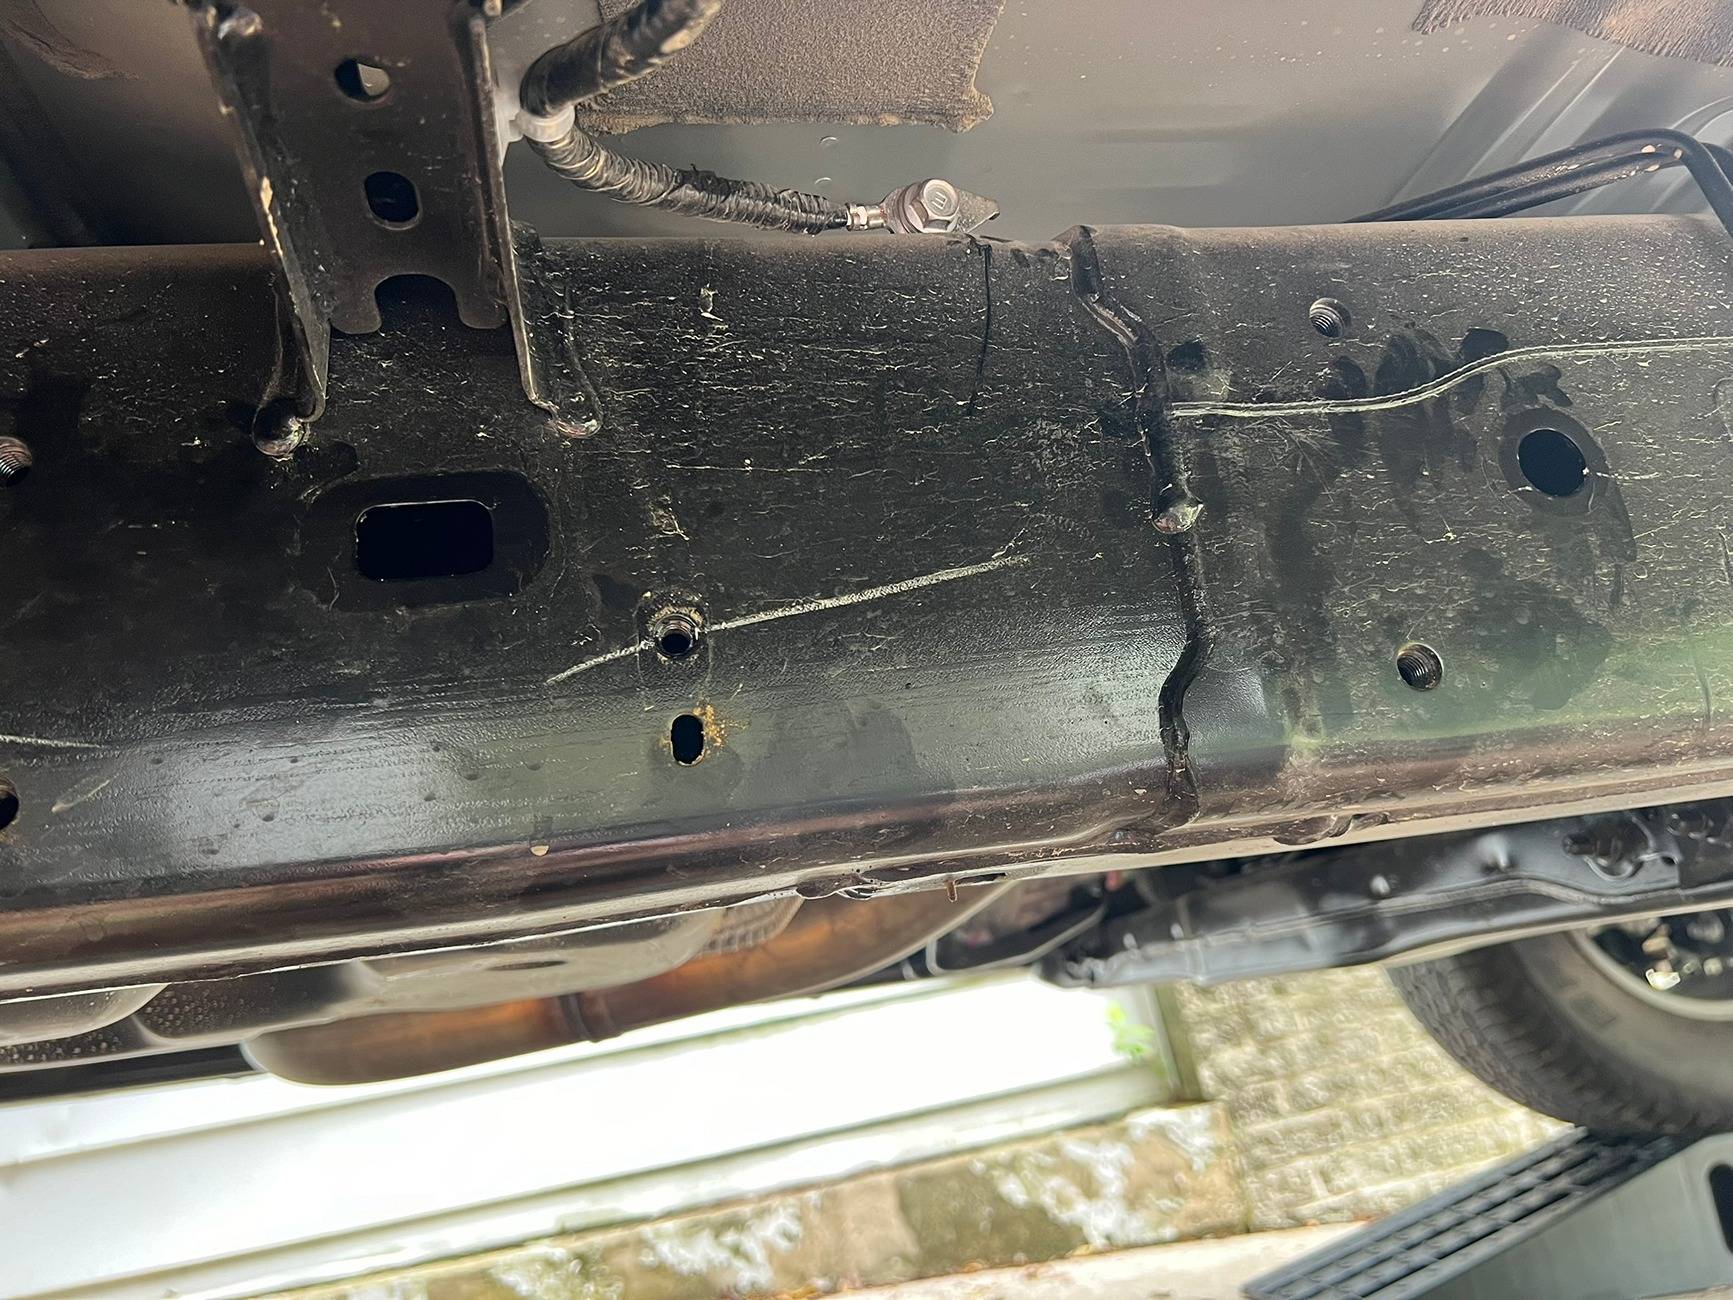
Next came the prep; also similar to the video, except for me, there were two extra items to address (all on the passenger side of the truck). The TRD OR has a skid "plate" protecting the fuel tank held on with (5) small bolts which needed a 12mm socket to remove. You might think you can work around the skid plate, but trust me, save yourself the headache and take a minute to remove it! You will also need to remove a small supporting bracket (pictured below) bolted onto the bottom of the frame exactly as shown in the video guide.
*Note: all of the OEM bolts which need to be removed require a 12mm socket, and also, the cardboard that came with the packing makes for a much nicer experience while laying on the ground. Just sayin'!
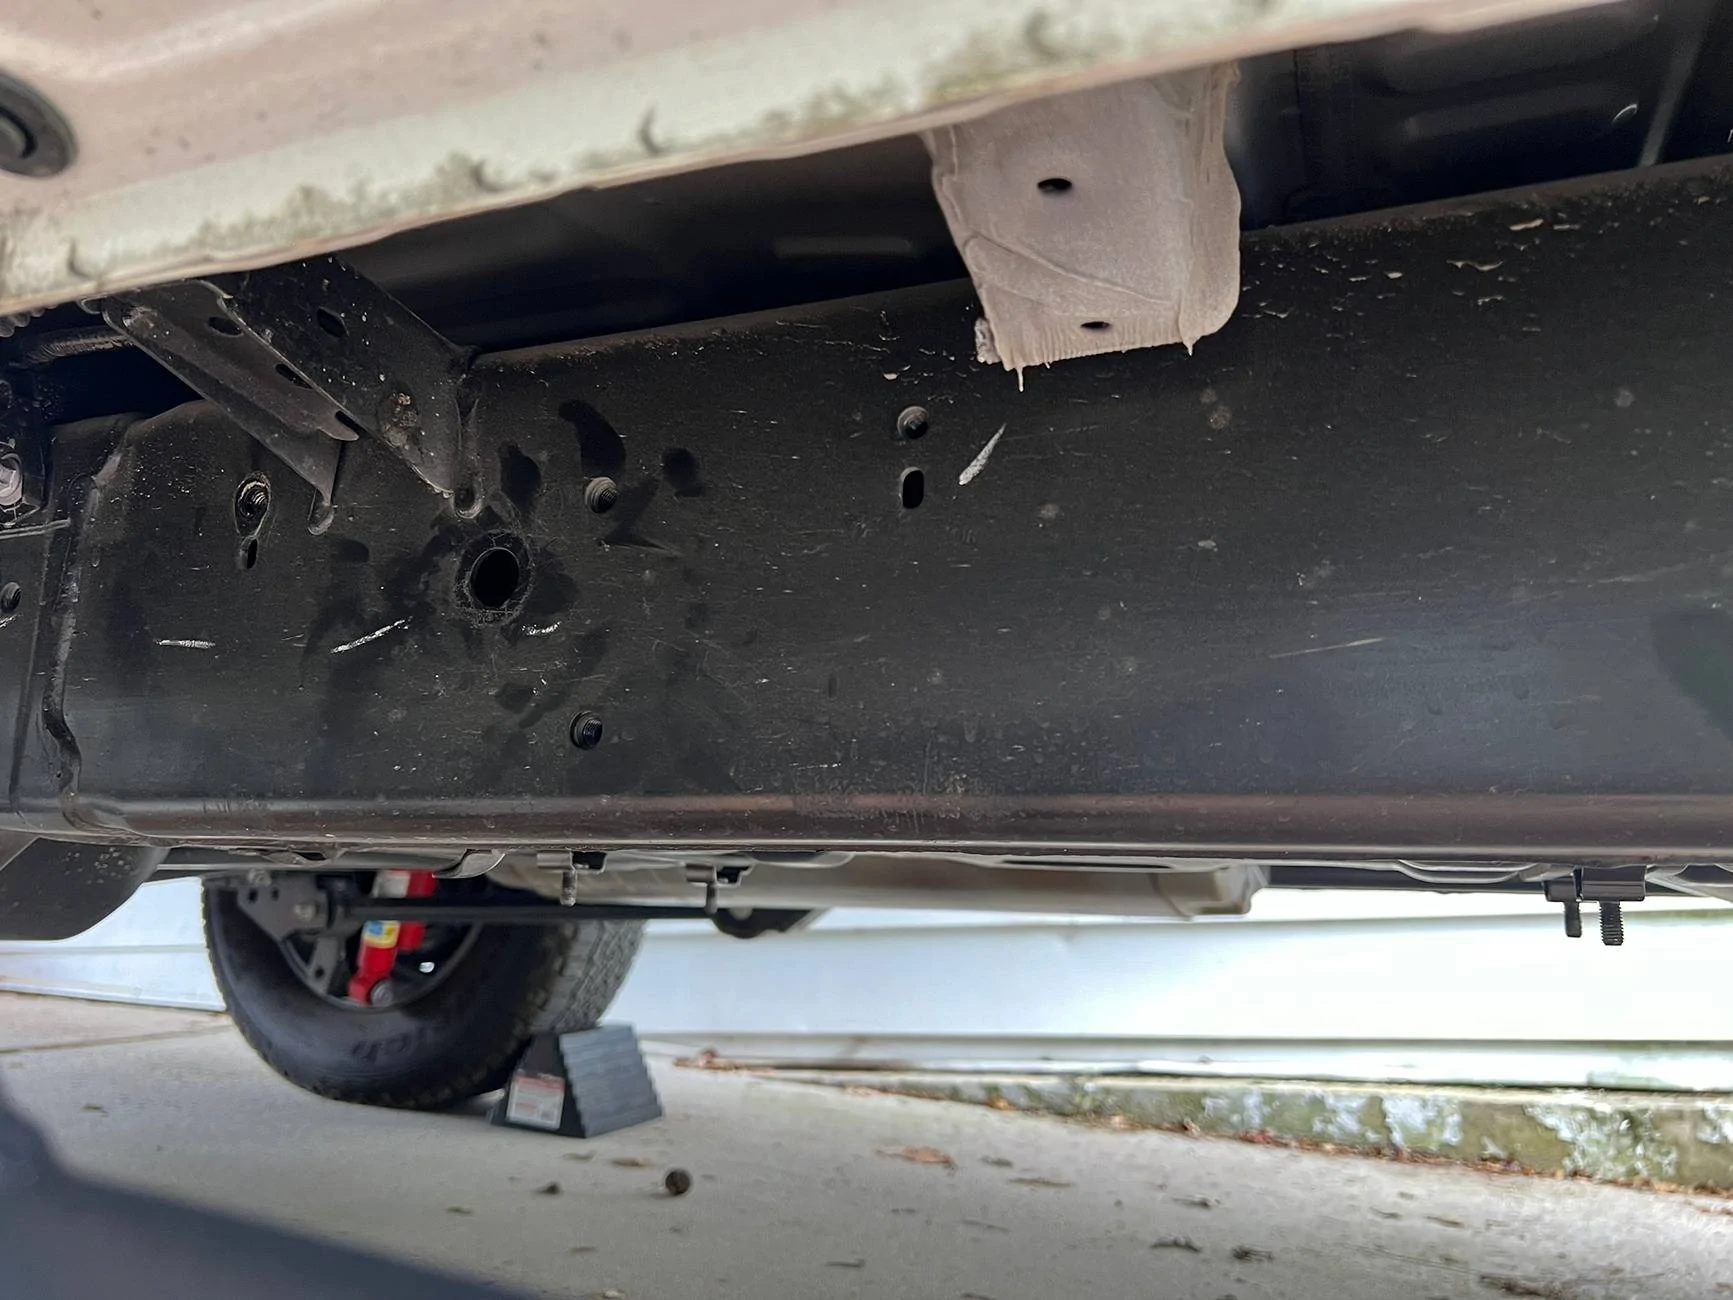
There were (2) ground wires also bolted to the side of the frame which needed to come off (again, the truck in the video only appeared to have a single ground wire. Once unbolted, I tucked them up on top of the frame to keep them out of the way. There were (12) plastic frame "plugs" which needed to be removed as well. There (3) of them on each side of the frame. I used a razor blade and my handy pry tool to pop the plugs out without damaging them (into some random drawer to be forever forgotten). The plugs sit very flush against the frame, and I used the razor blade to assist in getting the pry tool where it needed to be.
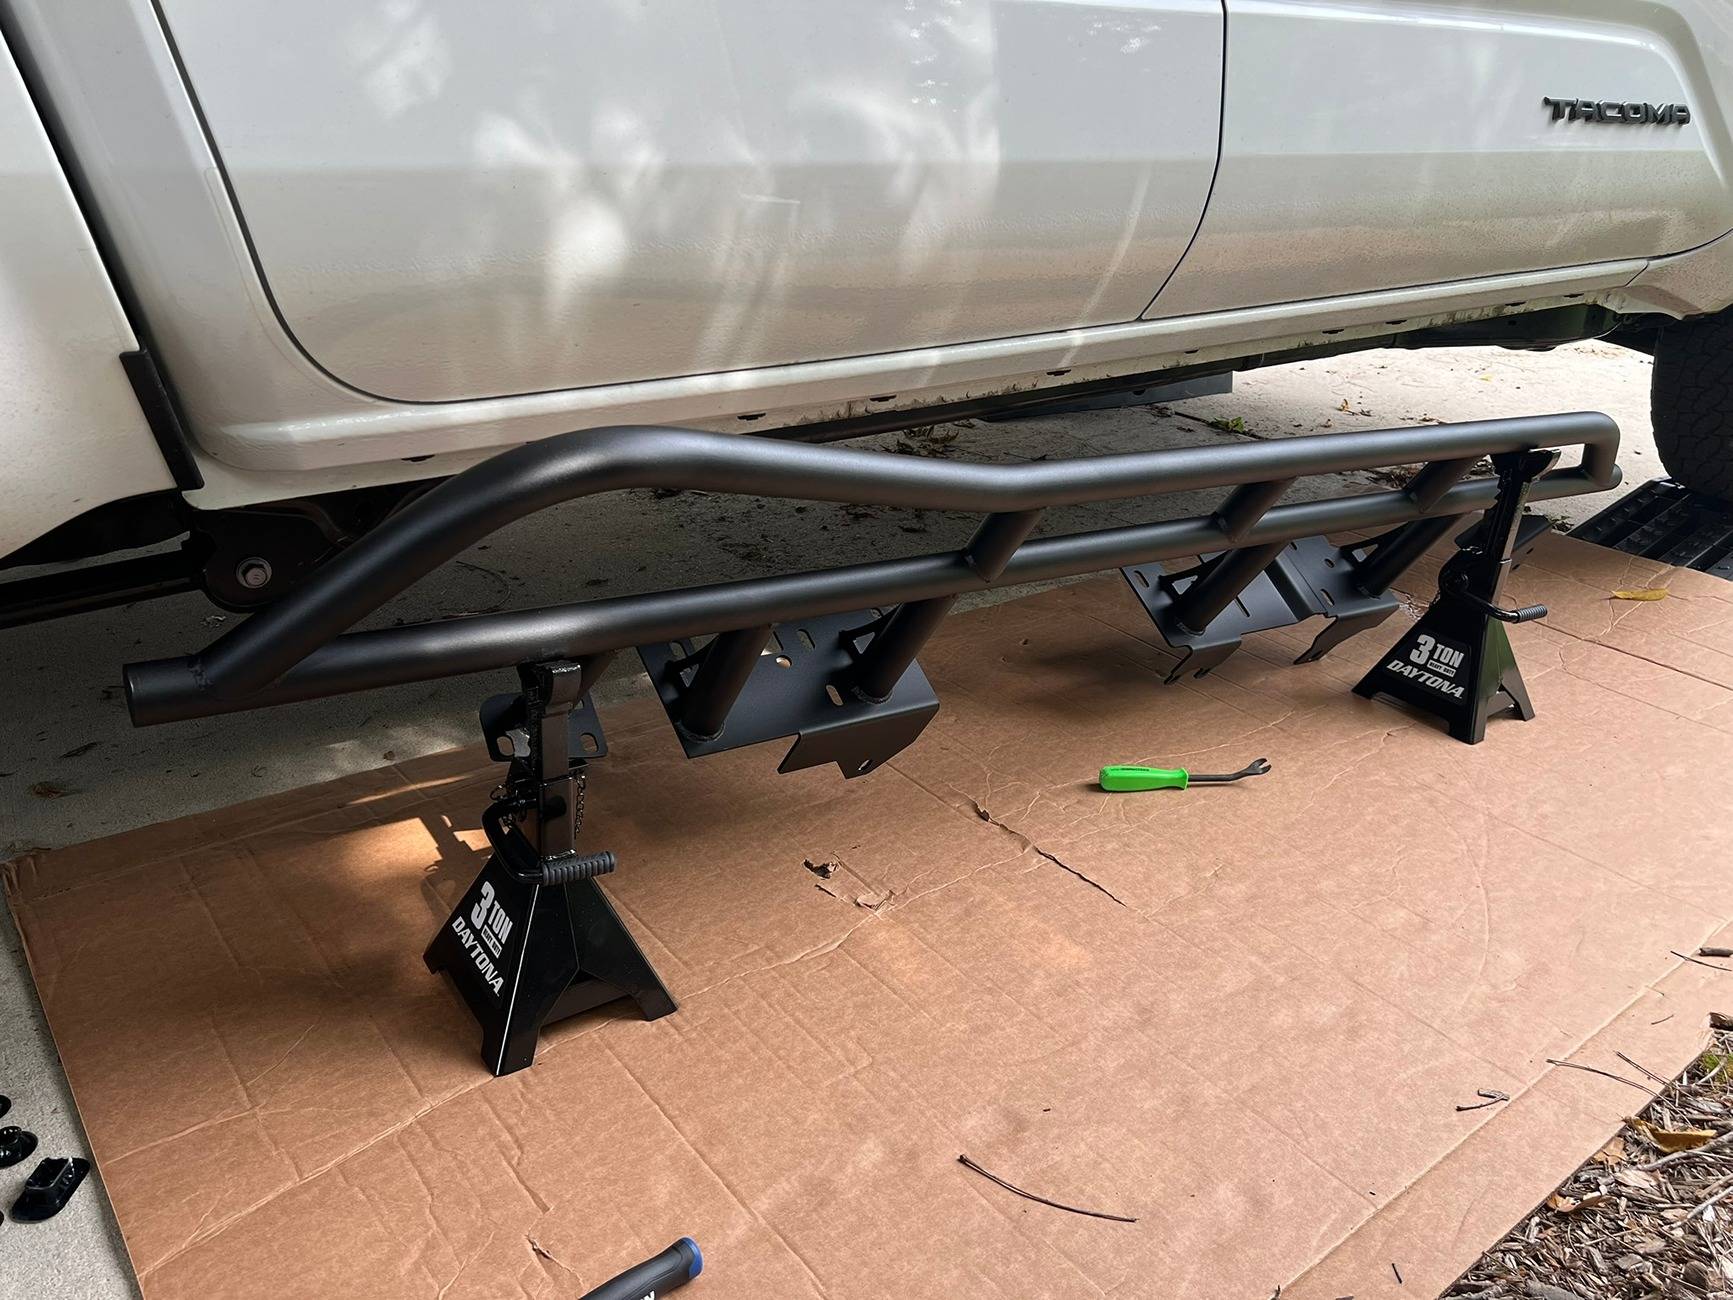
After I finished prepping the frame for the sliders, I decided to start on the passenger side as the guy in the video does. It also seemed a bit more intensive than the driver's side since there was more hardware to be concerned with. Obviously, I would need something to help hold the slider in place while installing the bolts, so I grabbed some small jack stands. The passenger side slider is the one with the extra flange for the fuel tank bracket in case it isn't easy enough to figure out.
Here's the passenger side slider propped up on the jack stands:
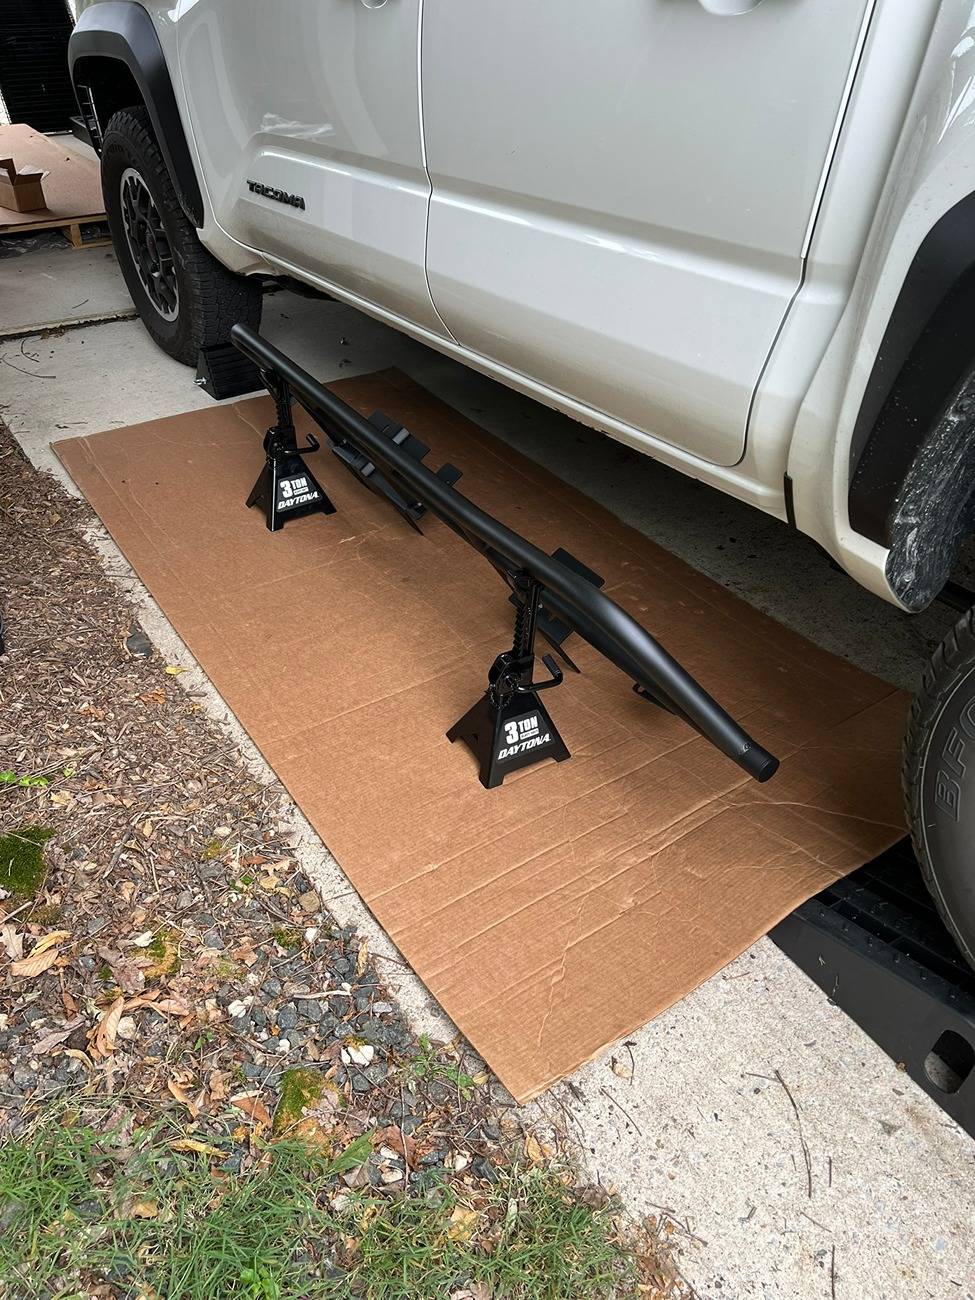
...and here's the driver's side:
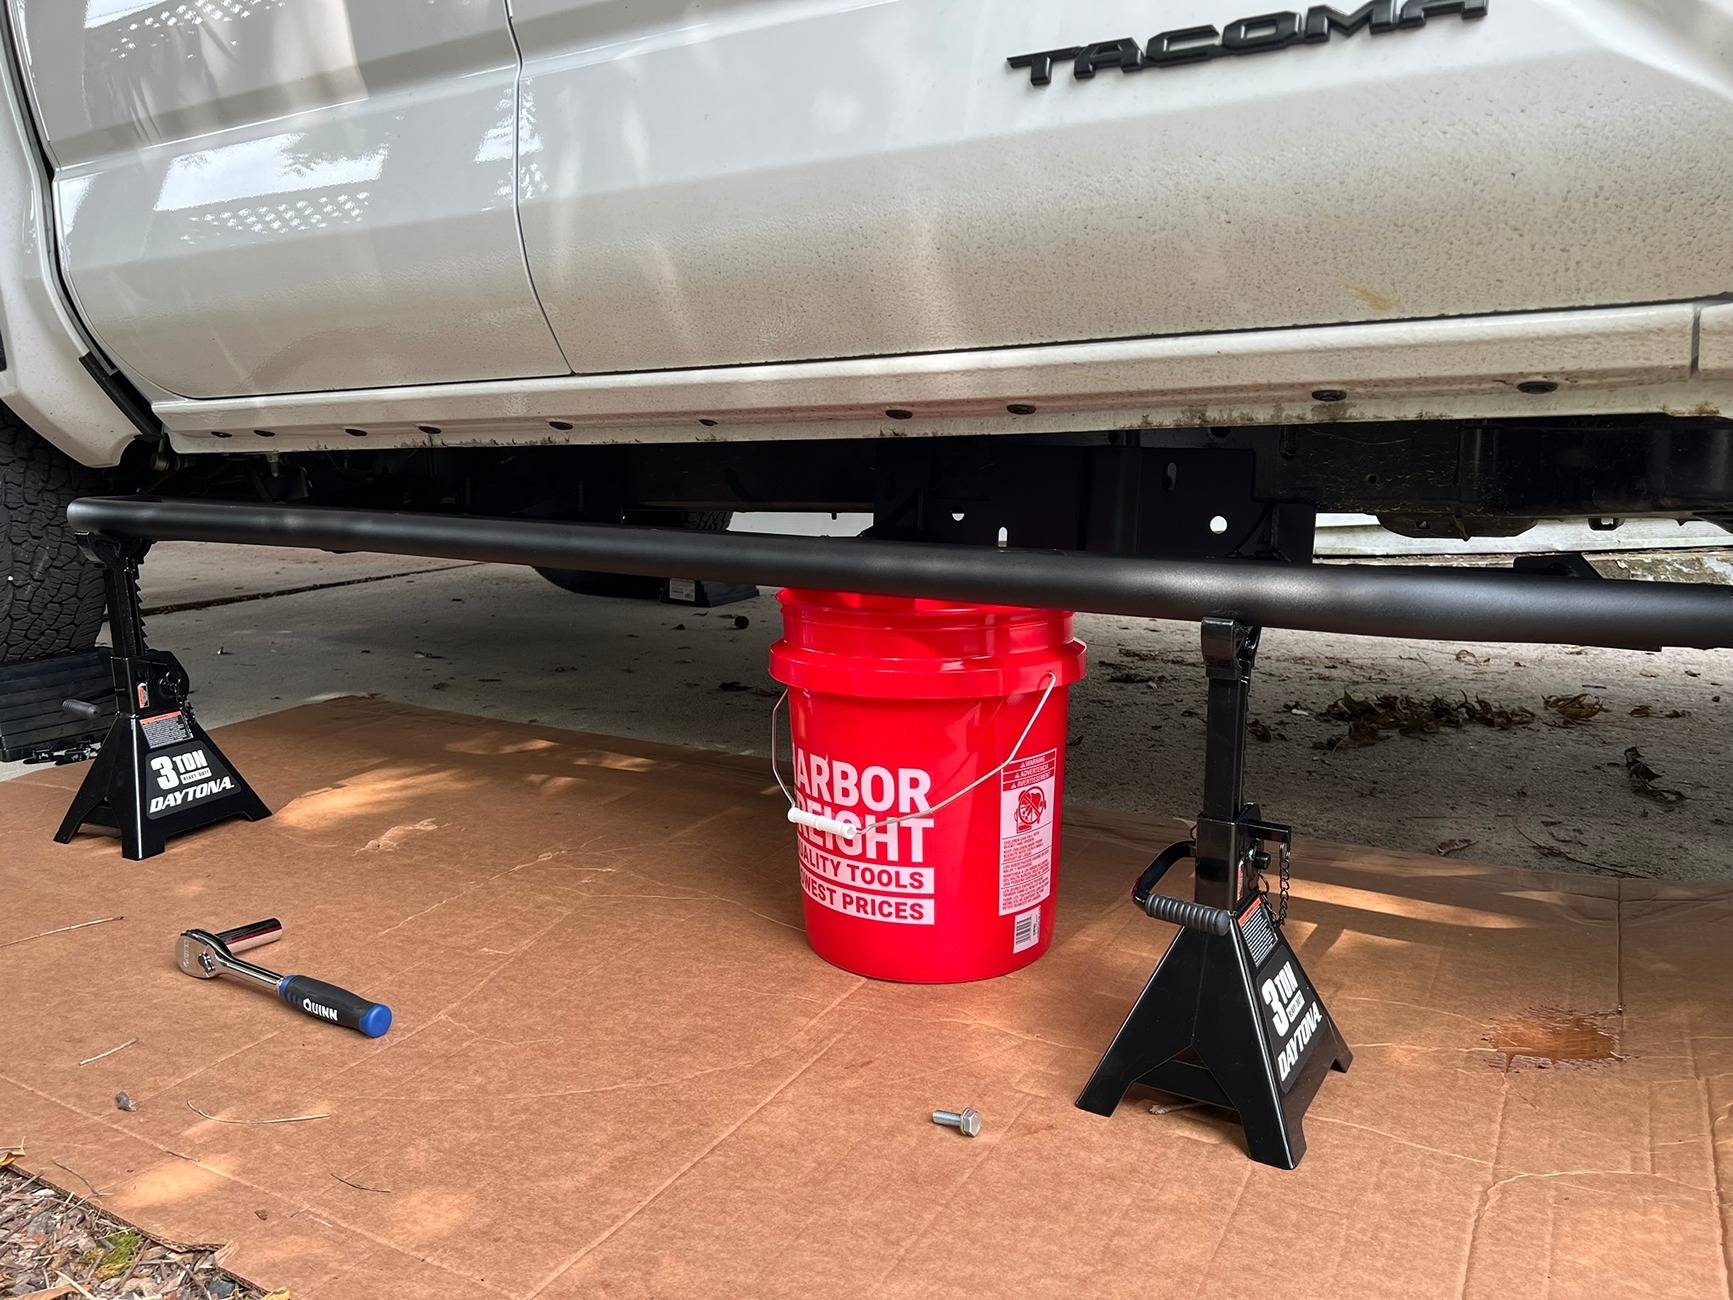
Quickly, I realized laying there trying to prop up one side of the slider with one hand and trying to thread a stubborn bolt with a washer on it in the other hand was very difficult LOL. Not to mention, getting everything lined up correctly and close to where it needed to be. For me, a five gallon bucket came to the rescue:
Now, the flanges were much closer to where I needed them, but I still ended up using various parts of my knees, back, and shoulders to really get it lined up perfectly. Did I mention that these things have to be lined up perfectly? The bolts will not go anywhere but as far as you can throw them if you aren't almost exactly where you need to be. Thankfully, once you get one M10 bolt in, the rest become much easier (until they don't).
While installing the M10 bolts (use a 17mm socket) through each flange and into the frame, don't bother tightening them down, in fact, only get them a few turns in because if your sliders were like mine, they won't all go in anyway. This is the part where you may begin questioning your own sanity. Fortunately, I was semi-prepared for this scenario after reading another user's post on this forum regarding their experience installing these things. They wound up enlarging some of the bolt slots to make them fit, and this was not something that I was looking forward to doing on my brand-new, $1300 rock sliders! I wound up loosening bolts, tightening bolts, removing bolts, kicking, beating (with a rubber mallet, of course lol), and eventually, I was able to get all but two of the M10 bolts installed (one missing on each slider). There was simply no way to get all of the bolt holes to line up well enough, and, just like the aforementioned user, my driver side slider was even more difficult (alignment wise) than the passenger side. Maybe, if it was possible to flip the entire truck upside down, maybe they'd all line up perfectly. I will never know, in any case. I chose to settle with one missing bolt on each side of the truck (no big deal, I think). All of the OEM hardware, like the (2) ground wires and the fuel tank bracket, fit where it needed to without too much fuss.
*Note: only one, single M8 bolt (use a 13mm socket) is used, and it goes with the passenger side slider. I triple checked to make sure I wasn't missing anything LOL. Installing the additional "L" brackets with the 1/2" hardware (use a 3/4" socket and a wrench for these) was also helpful in getting the slider snug up against the frame which, in turn, helped align some of the holes for the M10 bolts).
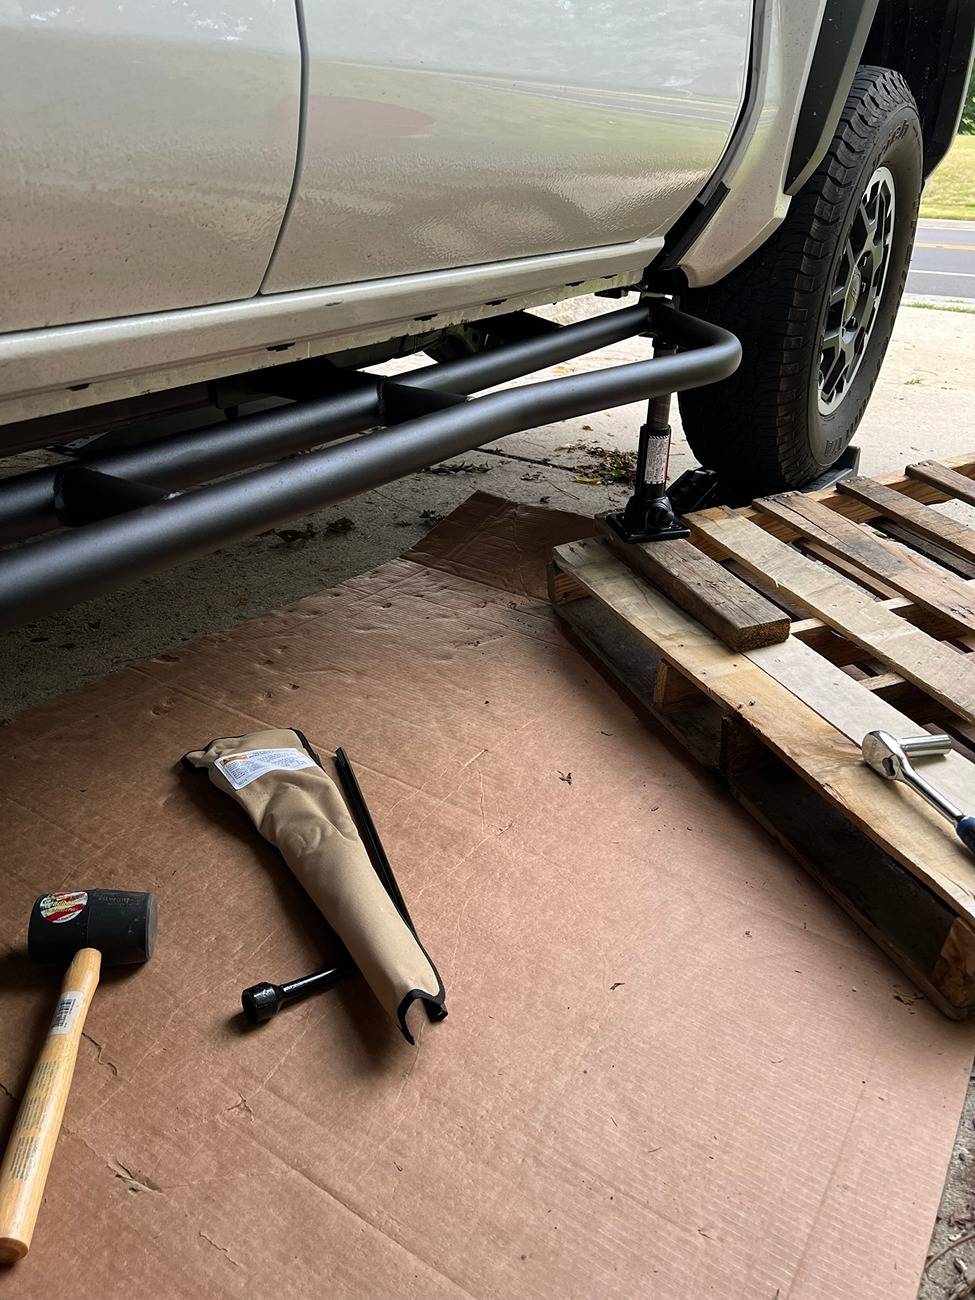
Getting these things on required a bit of creativity. With another person, it may have been a bit easier, but I don't think a helper can make the flanges line up perfectly either unless they're exceptionally strong. Here, I used my factory supplied bottle jack to force the driver's side slider into place as best I could, as it soon became apparent that I was not physically or mentally strong enough to bend steel tubing, even slightly:
Safety first! After multiple attempts to get bolts aligned on the driver's side (I mean MULTIPLE: starting from one end and working my way down, starting over from the other direction, one bolt at each end, no bolts at either end, with the mounting brackets attached and without, and so on) this is how I got it to all but one missing M10 bolt:
I lined up the two holes on the end closest to the front tire (these bolts are inserted vertically, upside down, through the flange and into the bottom of the frame) with my jack stands and buckets. I inserted both M10 bolts at that end. I tightened them down, but not fully tight. I was a little concerned about the flange bending here because this appears to be the weakest point of an otherwise incredibly stout chunk of steel. Rather than working my way down from there, I went to the opposite end of the slider and pushed up and in (towards the cab of the truck) as hard as I could to see if the holes were even close to lining up... they weren't. Before I pulled out all my hair, I remembered the bottle jack behind the back seat. I figured, screw it, I've tried everything else. You can see in the picture below where I placed the jack in relation to the rest of the slider. As I started raising the jack, I realized it was looking like my genius was starting to pay off! Slowly but surely, one of the holes appeared to be lined up, and then another. Sadly, of the three M10 bolts meant for the rear-side flange, only two made it home. Just like on the passenger side, it seemed impossible to get them all lined up. At this point, I was okay with leaving one out of each slider. I was not going to break out the Dremel and start shaving bits of flange #1 because I was not going to take either slider off again, and #2 there's like a billion bolts! What's one on each side? The bottle jack was embedded in the 2 x 4 pretty good, but it held. The slider didn't budge a millimeter after the jack was taken out. Here's what it looked like with all but one of the M10 bolts installed on the driver's side:
Now, about those brackets I mentioned earlier...
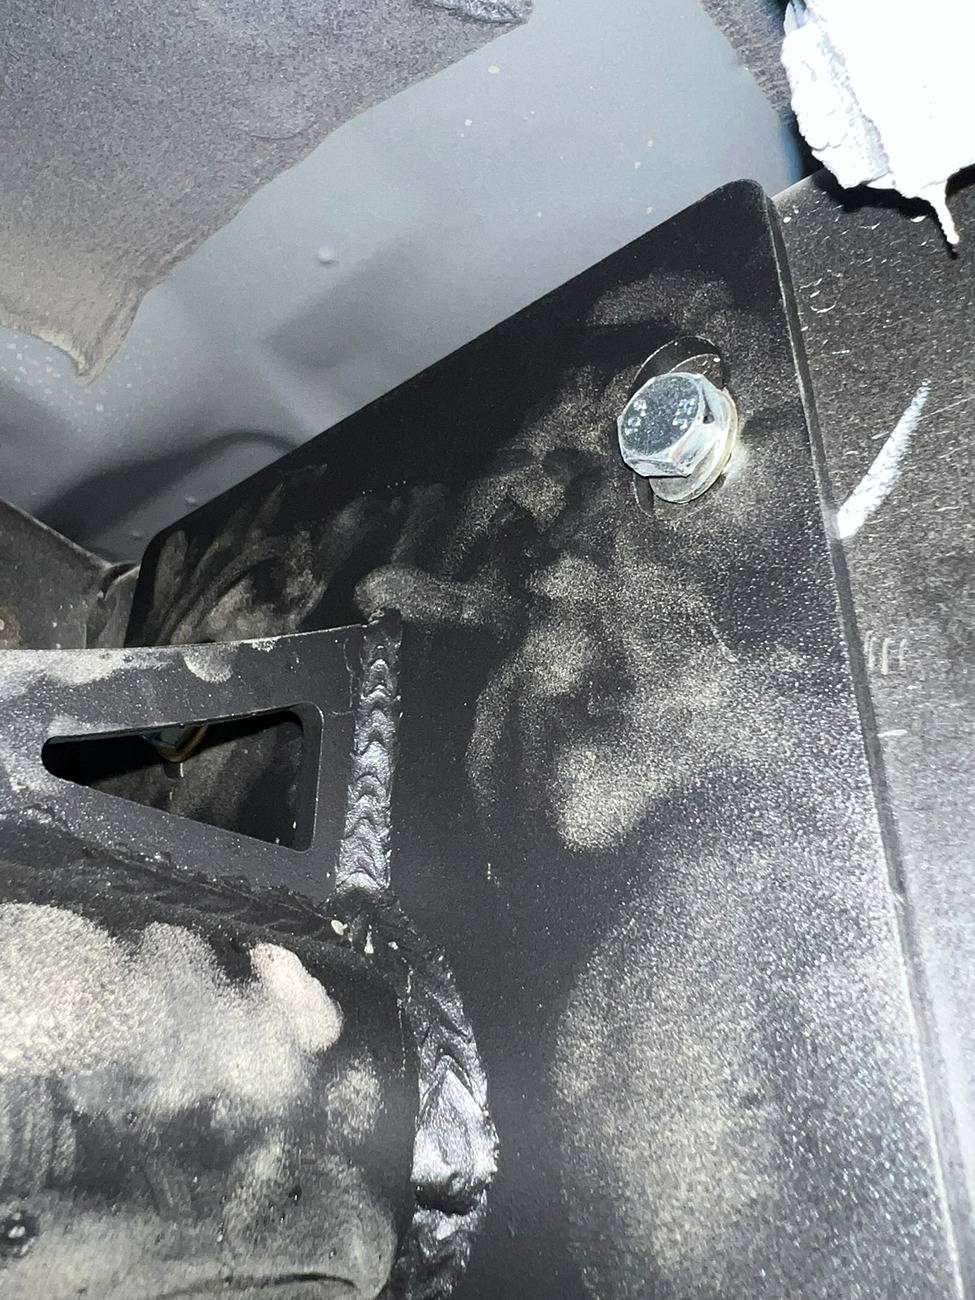
There are (2) brackets for the passenger side, and (3) for the driver's side. The passenger side slider was supposed to take one "L" shaped bracket and the oddly shaped bracket with the square, snap-nut. The remaining three "L" brackets were used on the driver side slider.
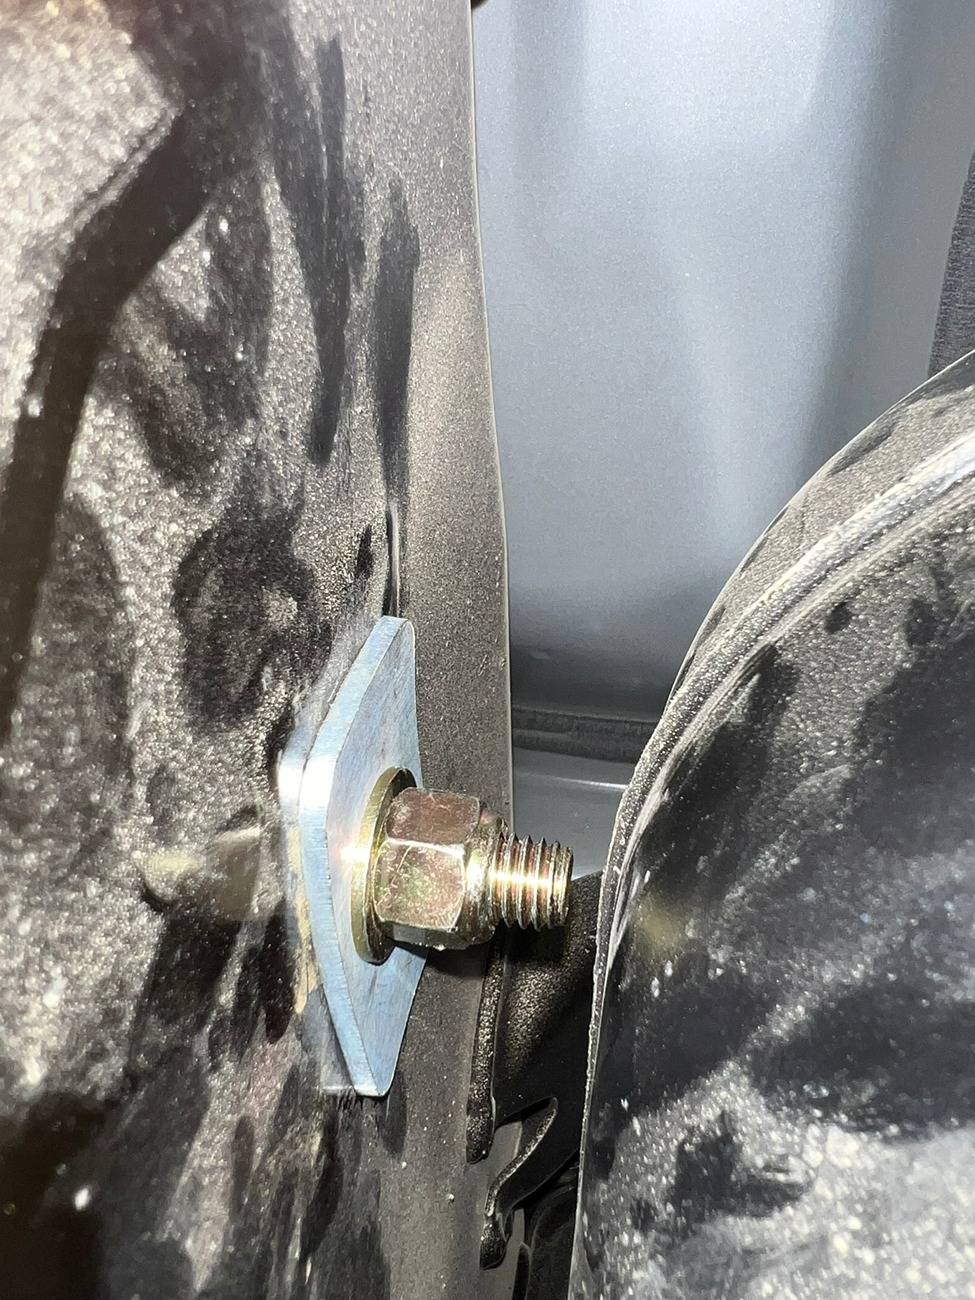
Each of the "L" shaped brackets installed easily enough; however, the oddly shaped bracket which mounts directly next to the fuel tank appeared to be built backwards. I rewatched the installation video about 20 more times at the extremely brief part where he very easily installs this particular bracket, and there was no way for me to line it up correctly, and I did try everything! The bare-metal "spacer" bracket... yeah, I have no idea where or how it was intended to be used, but the guy in the video put it somewhere (it looked like he used it on the passenger side), and I couldn't figure out if I was an idiot, or if maybe it just wasn't needed. Oh well! Cali Raised isn't open for questions on the weekend, so I wasn't able to find an actual answer. I will try to reach out to them during the week to see if I'll be okay with the two missing M10 bolts and the bracket.
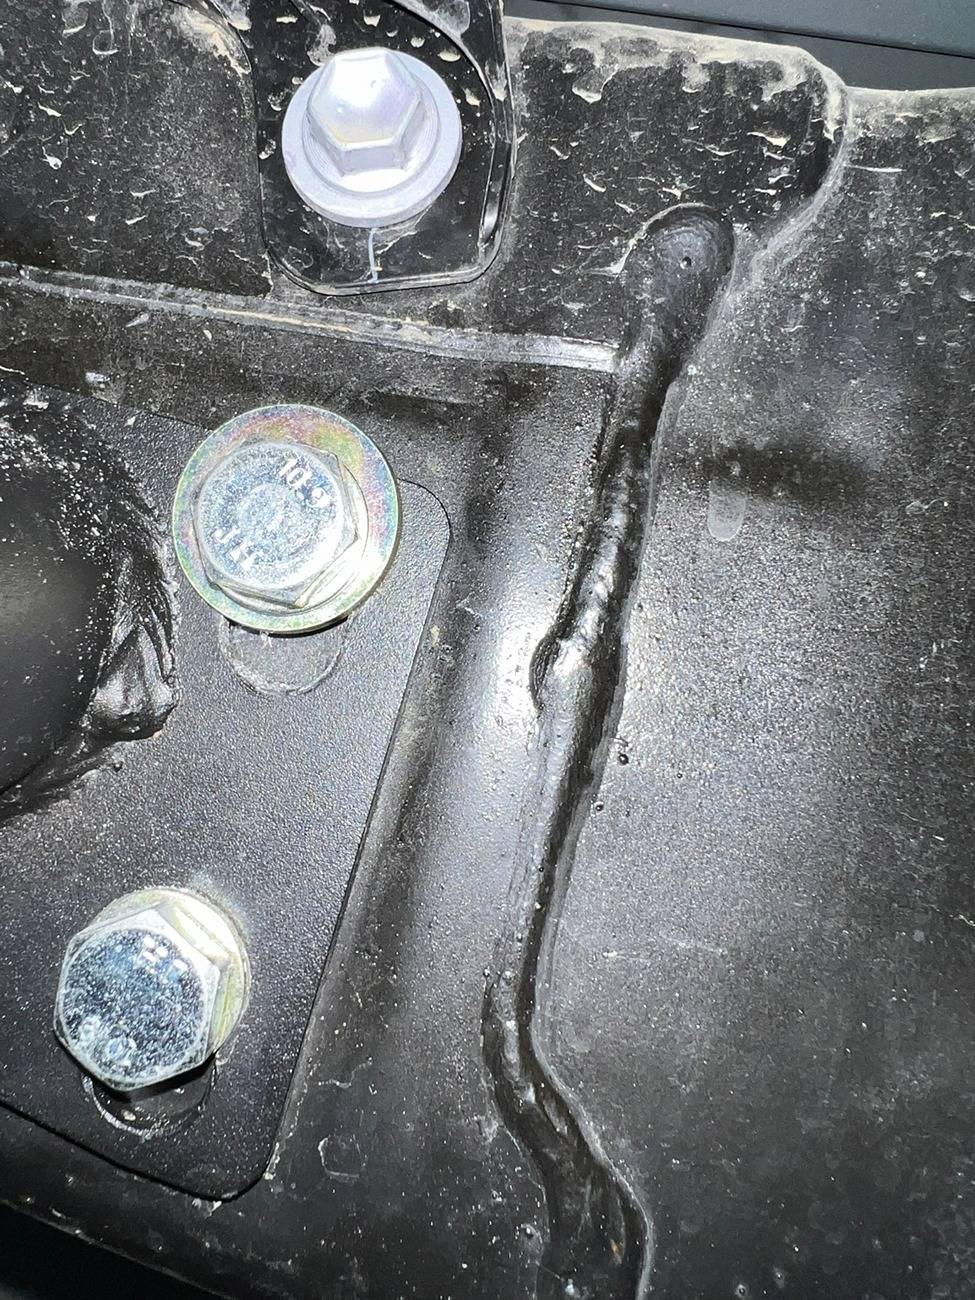
Here is the hardware that I was left with once I had finished installing the sliders:
Notice how the "oddly" shaped bracket has a flange at the bottom where the lower 1/2" bolt should attach to the slider. I believe that flange should be facing the opposite direction for the bracket to fit flush against the frame. You can put the snap-nut on the other side of the bracket, but then there is no way to install the nut and washer onto the bolt through bottom flange. You can also see the bare-metal spacer bracket here.
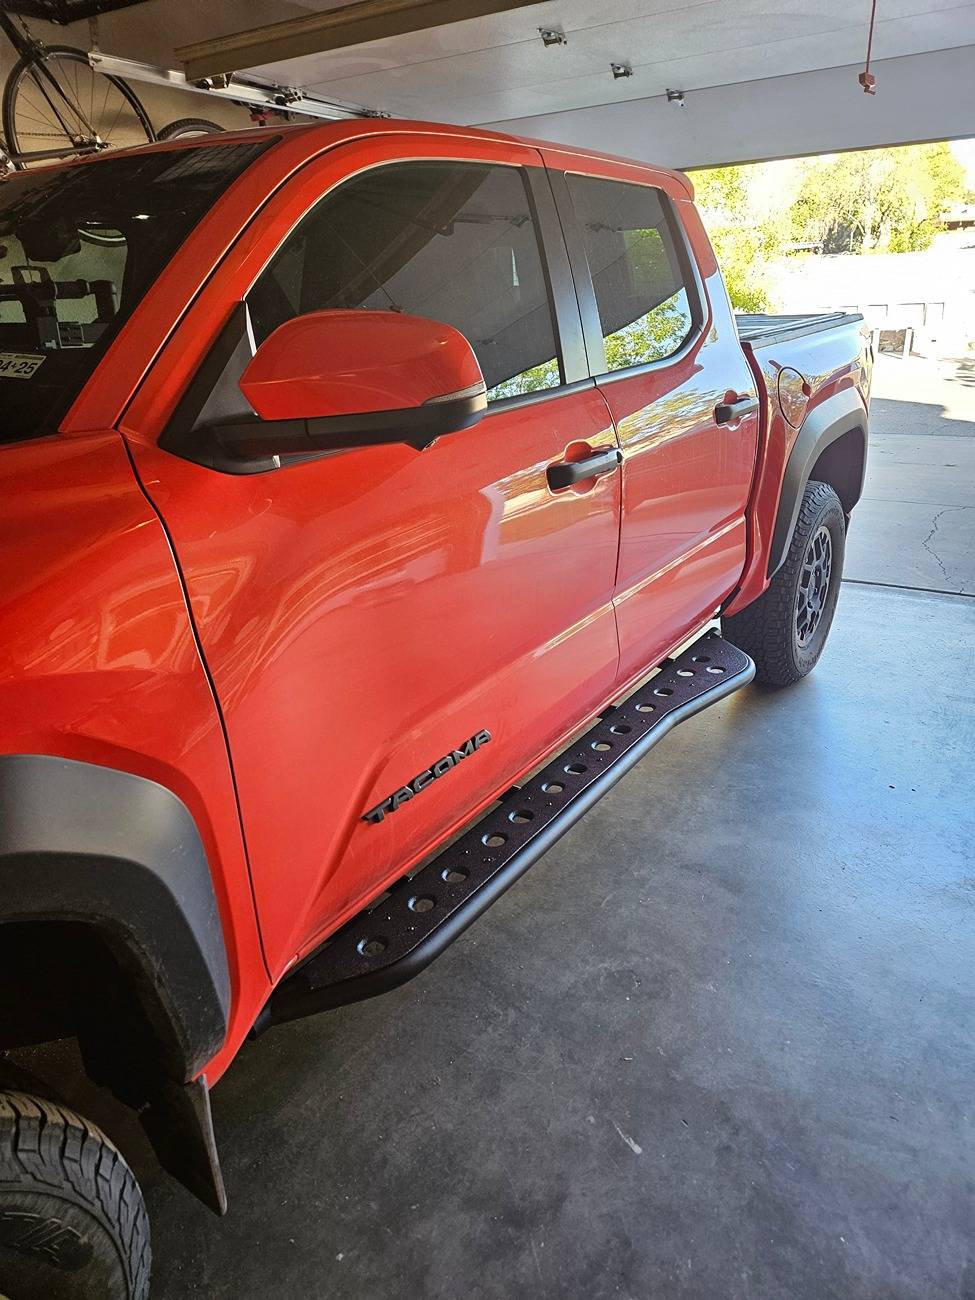
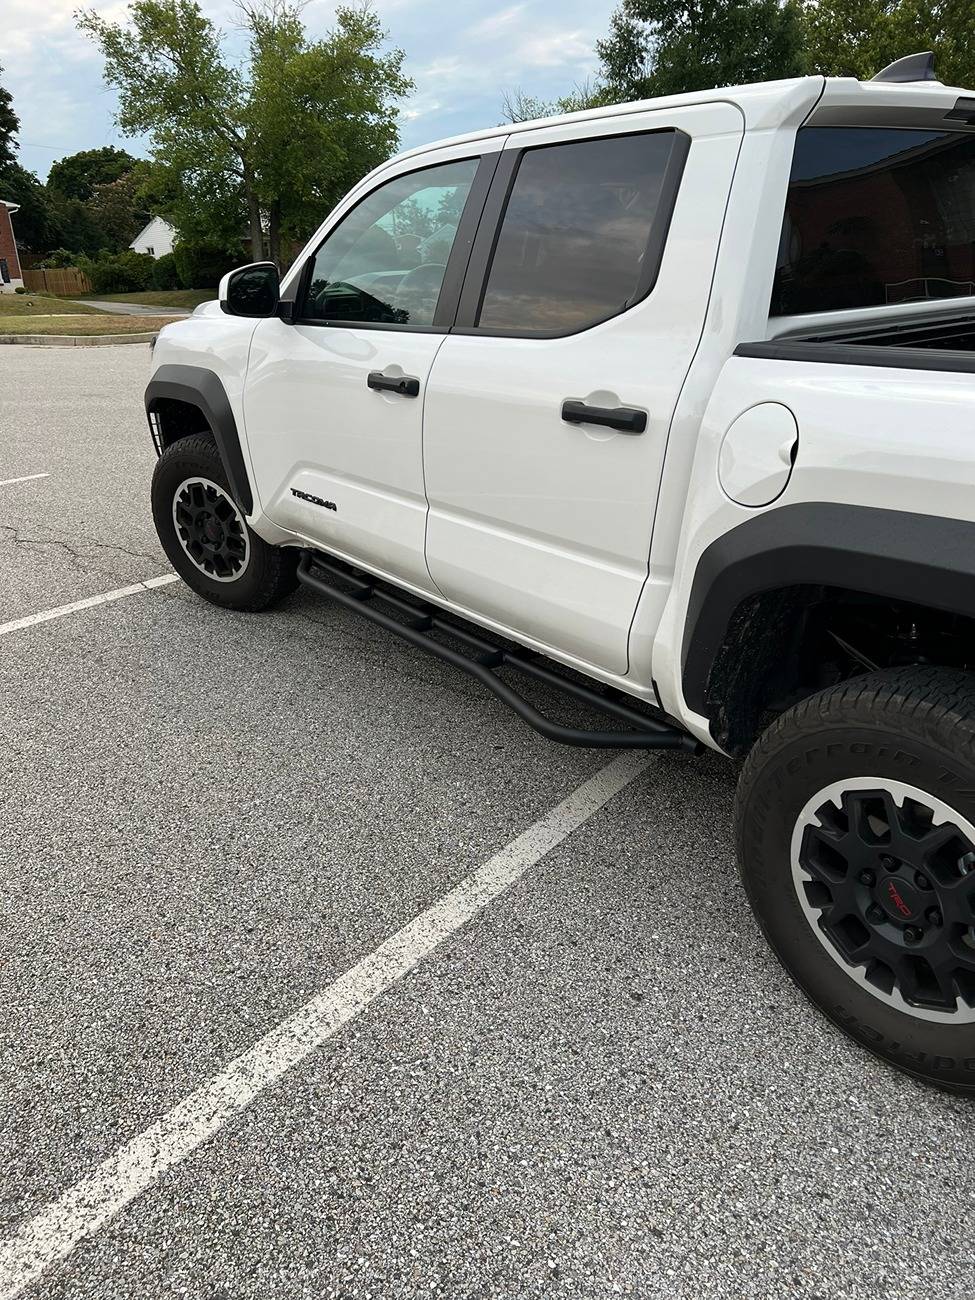
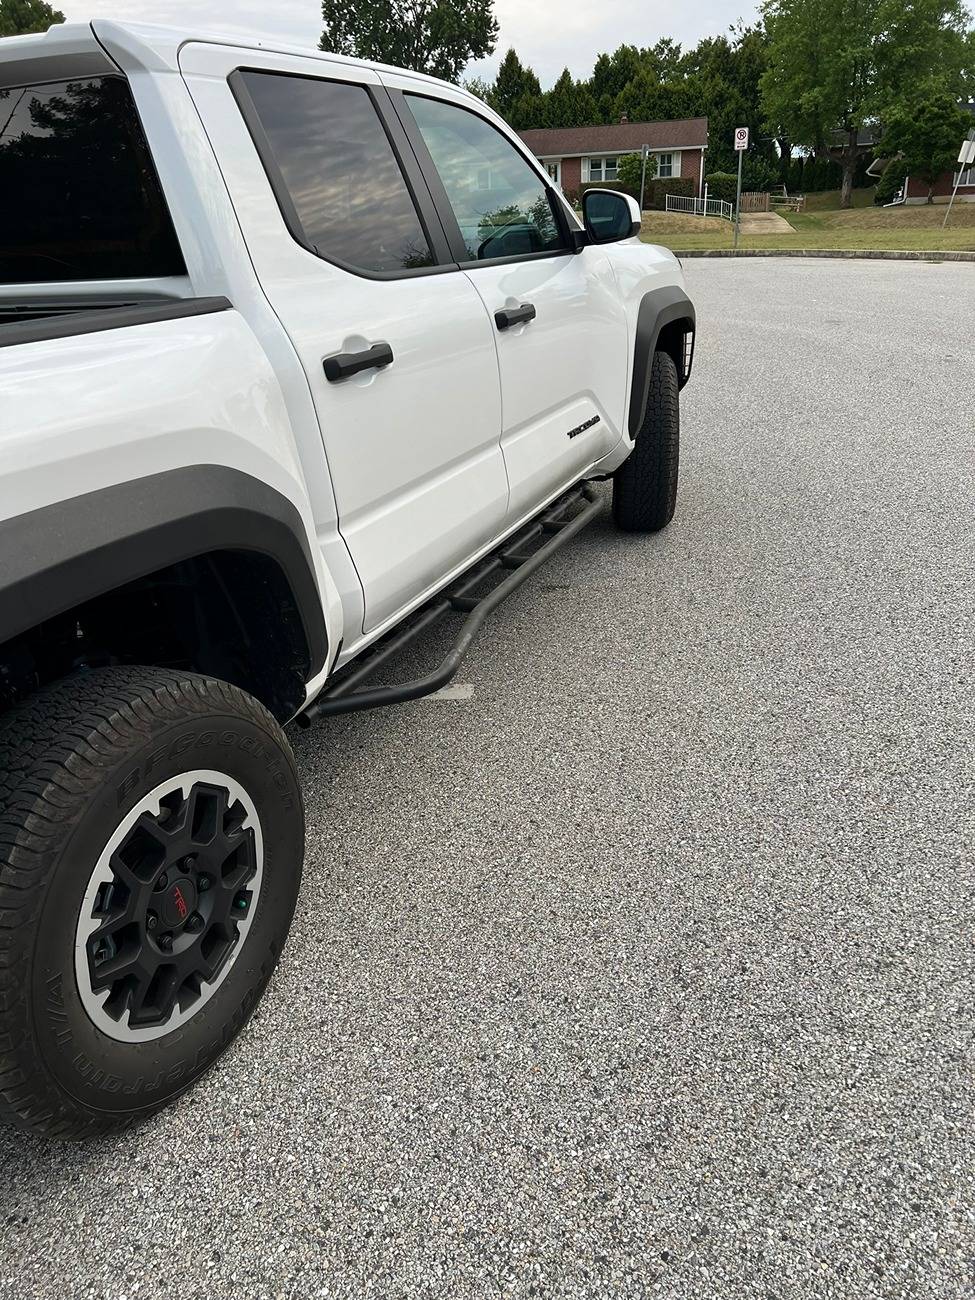
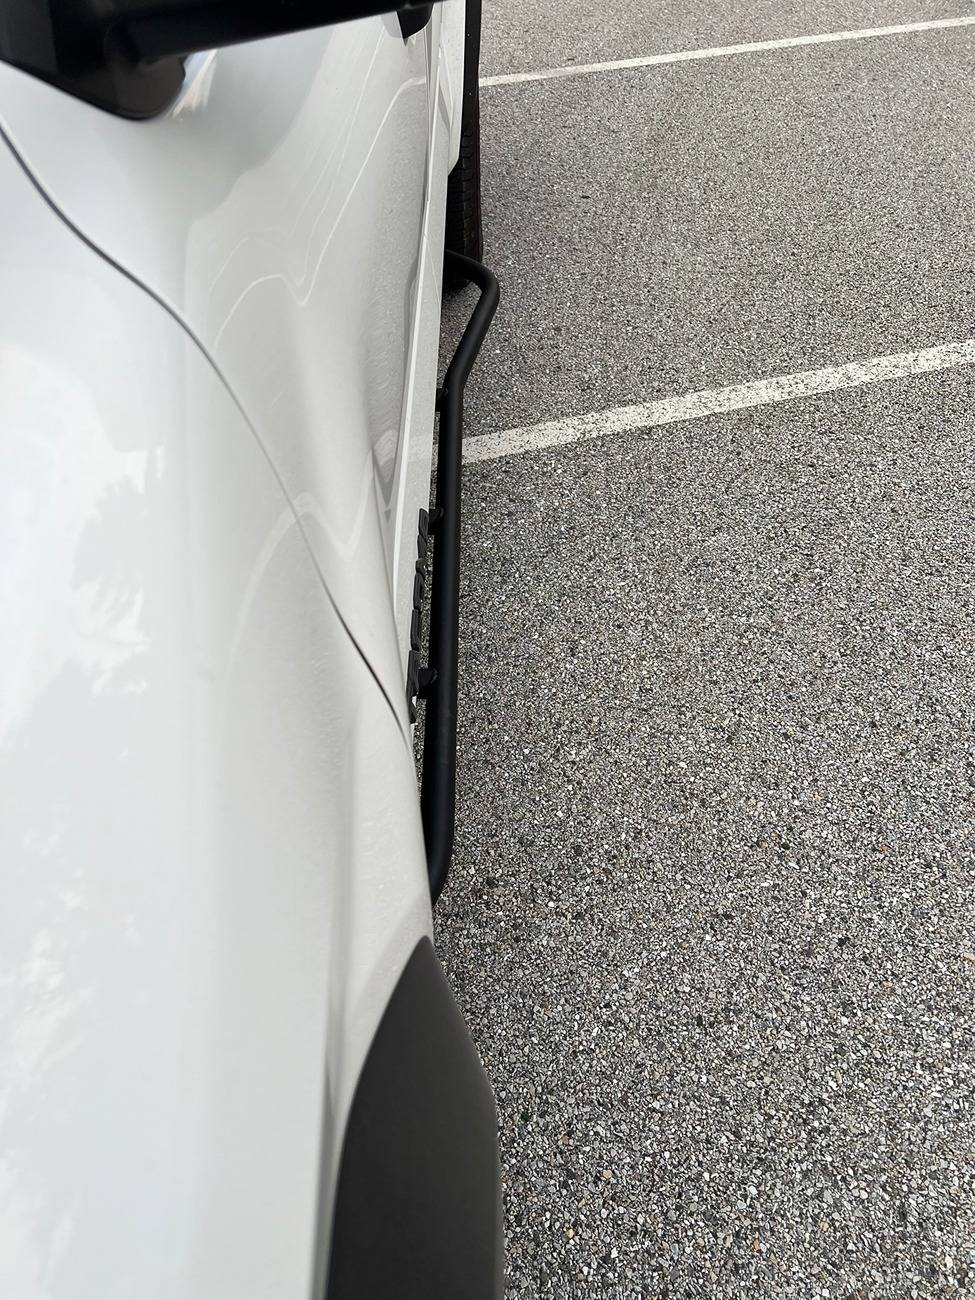
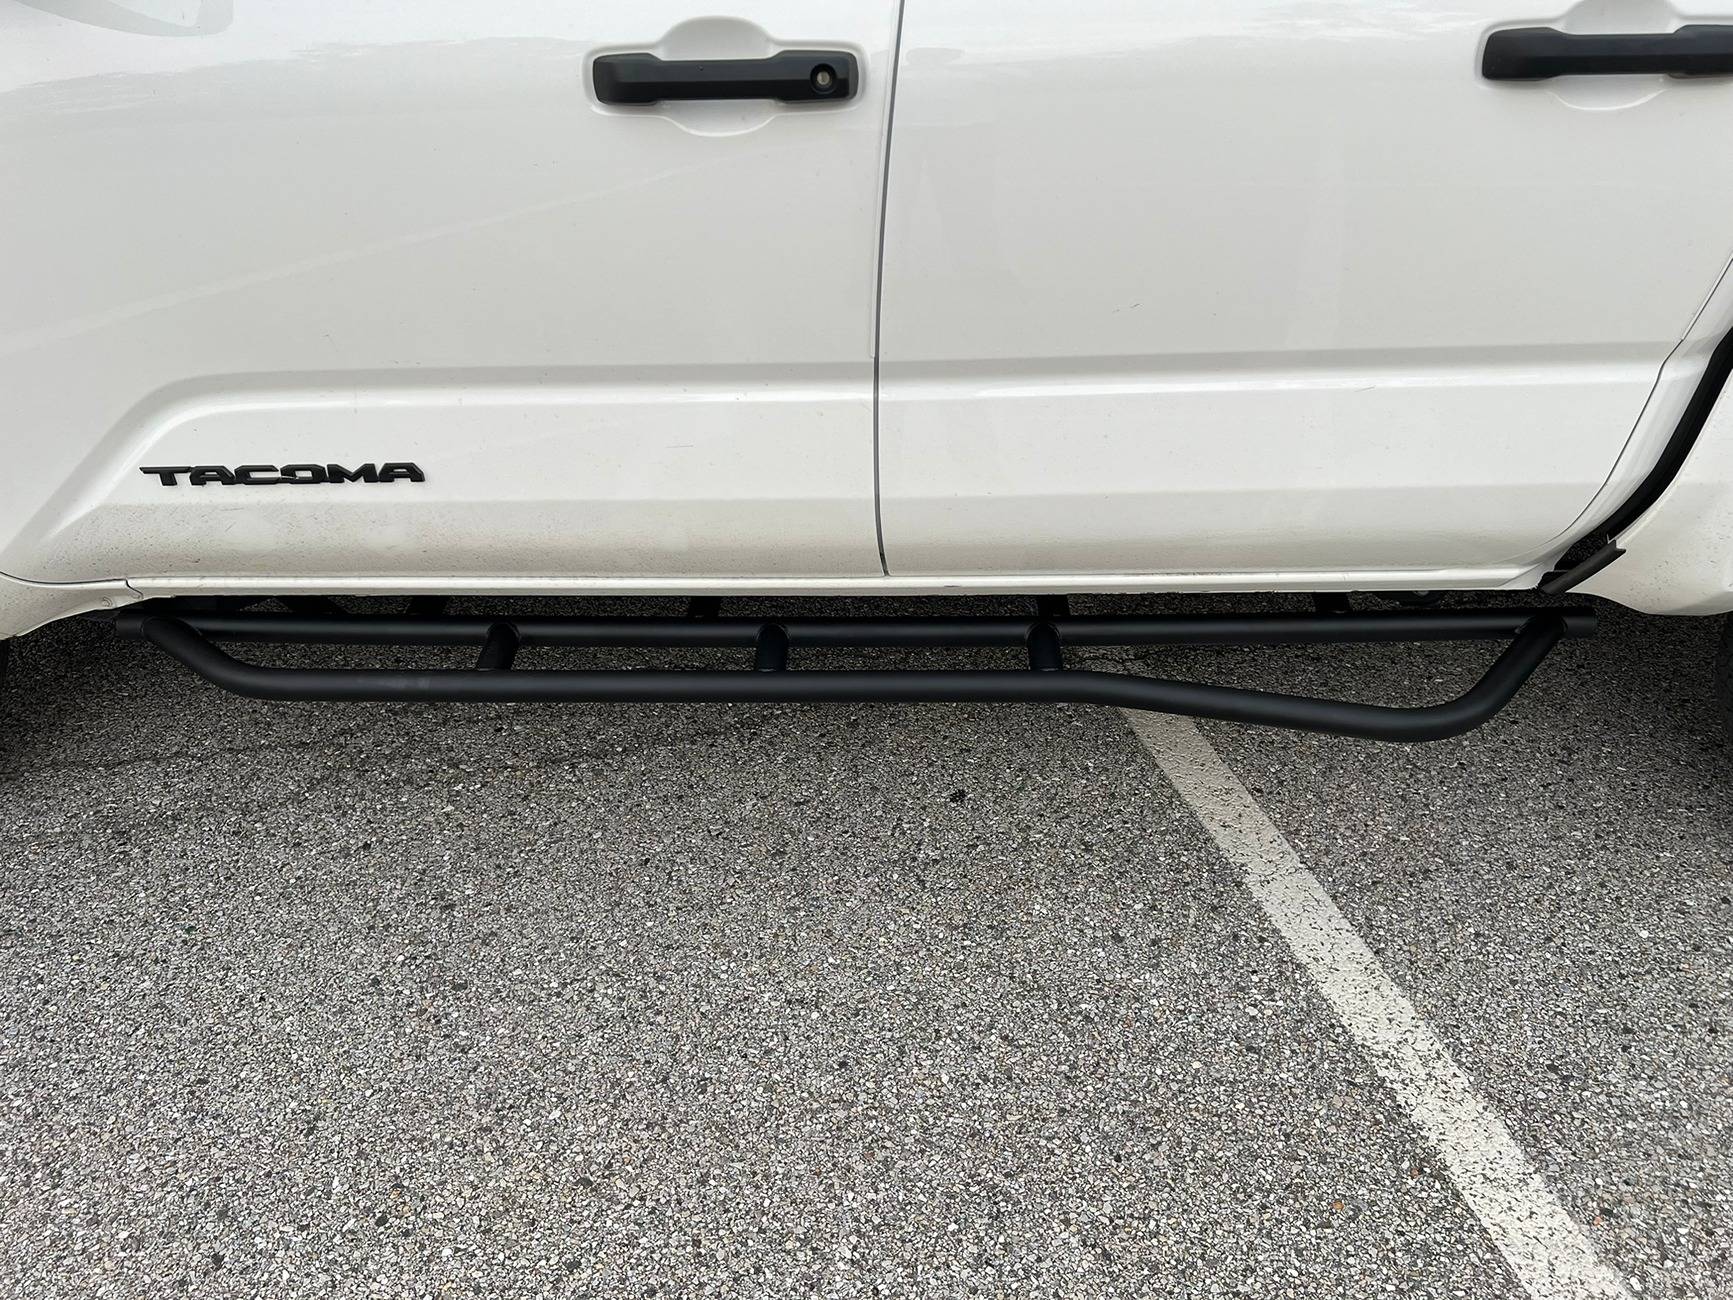
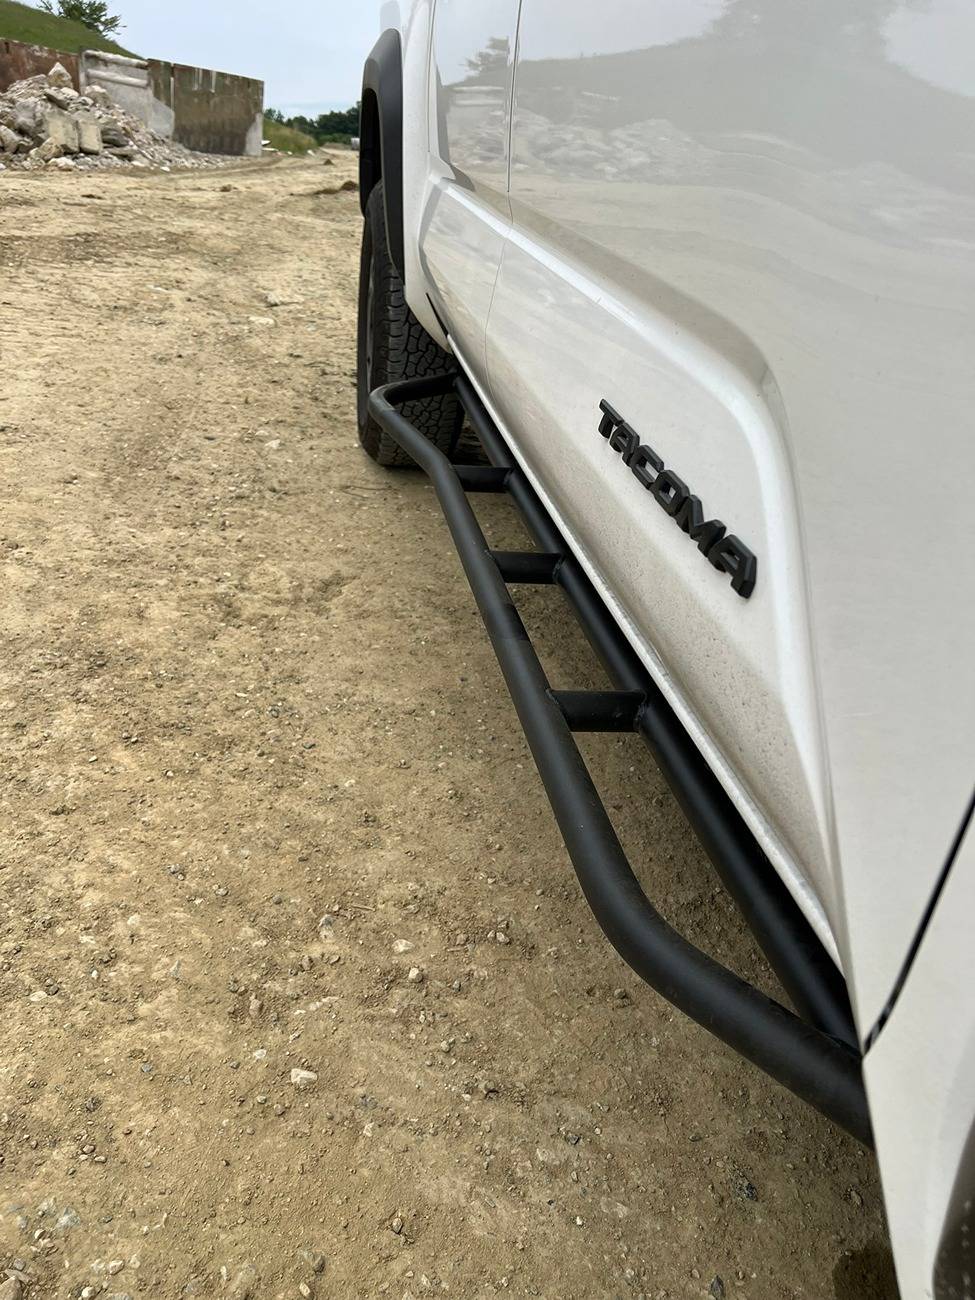
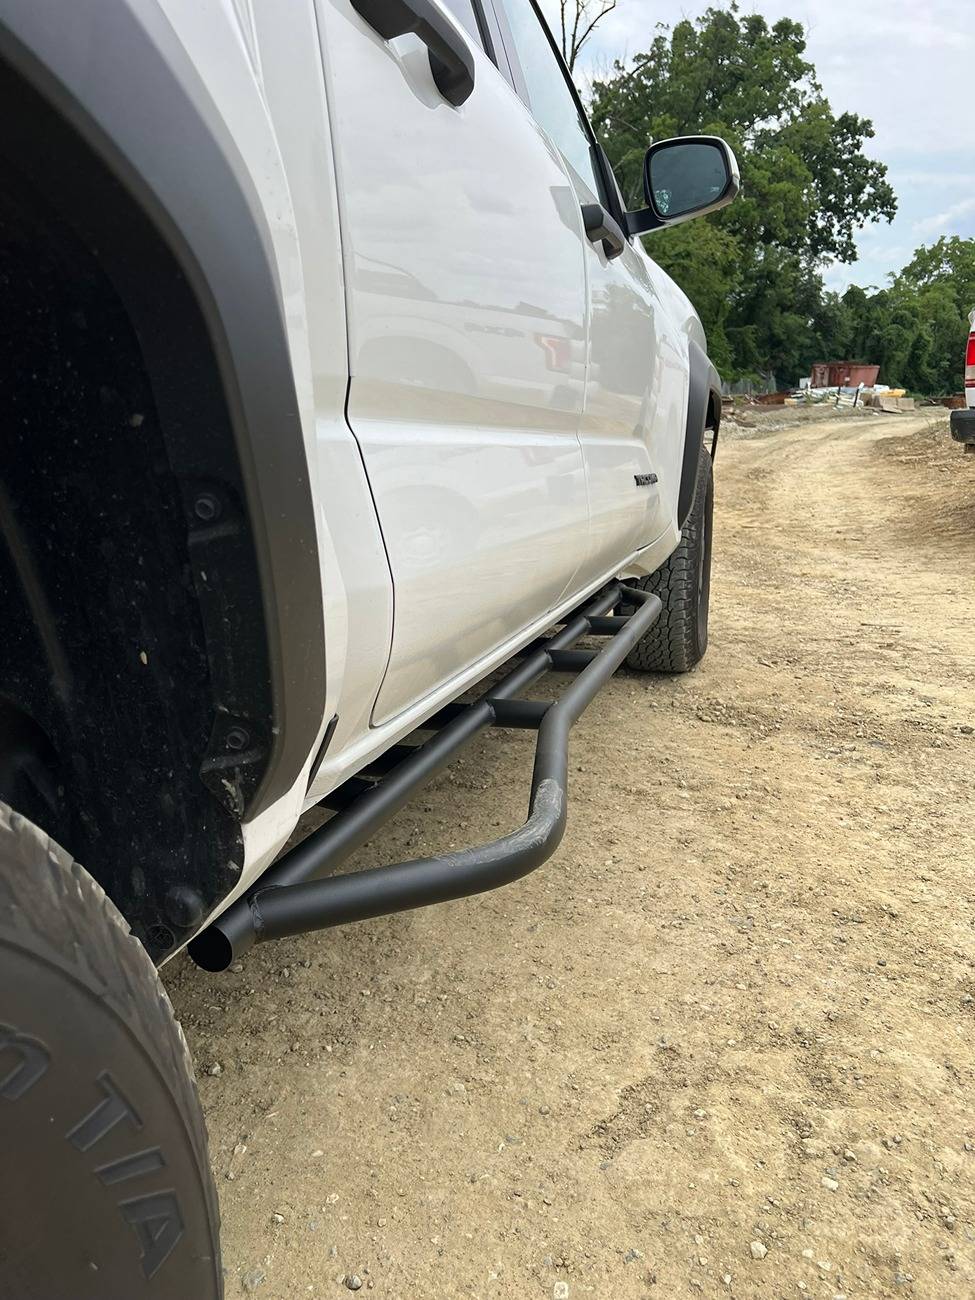
...And here are some pictures of the installed rock sliders:
So you can see the "step"-action going on:
I had to run into work for an emergency immediately after I had just finished installing the passenger side slider LOL. Yes, I know my truck is dirty... it gets dirty!
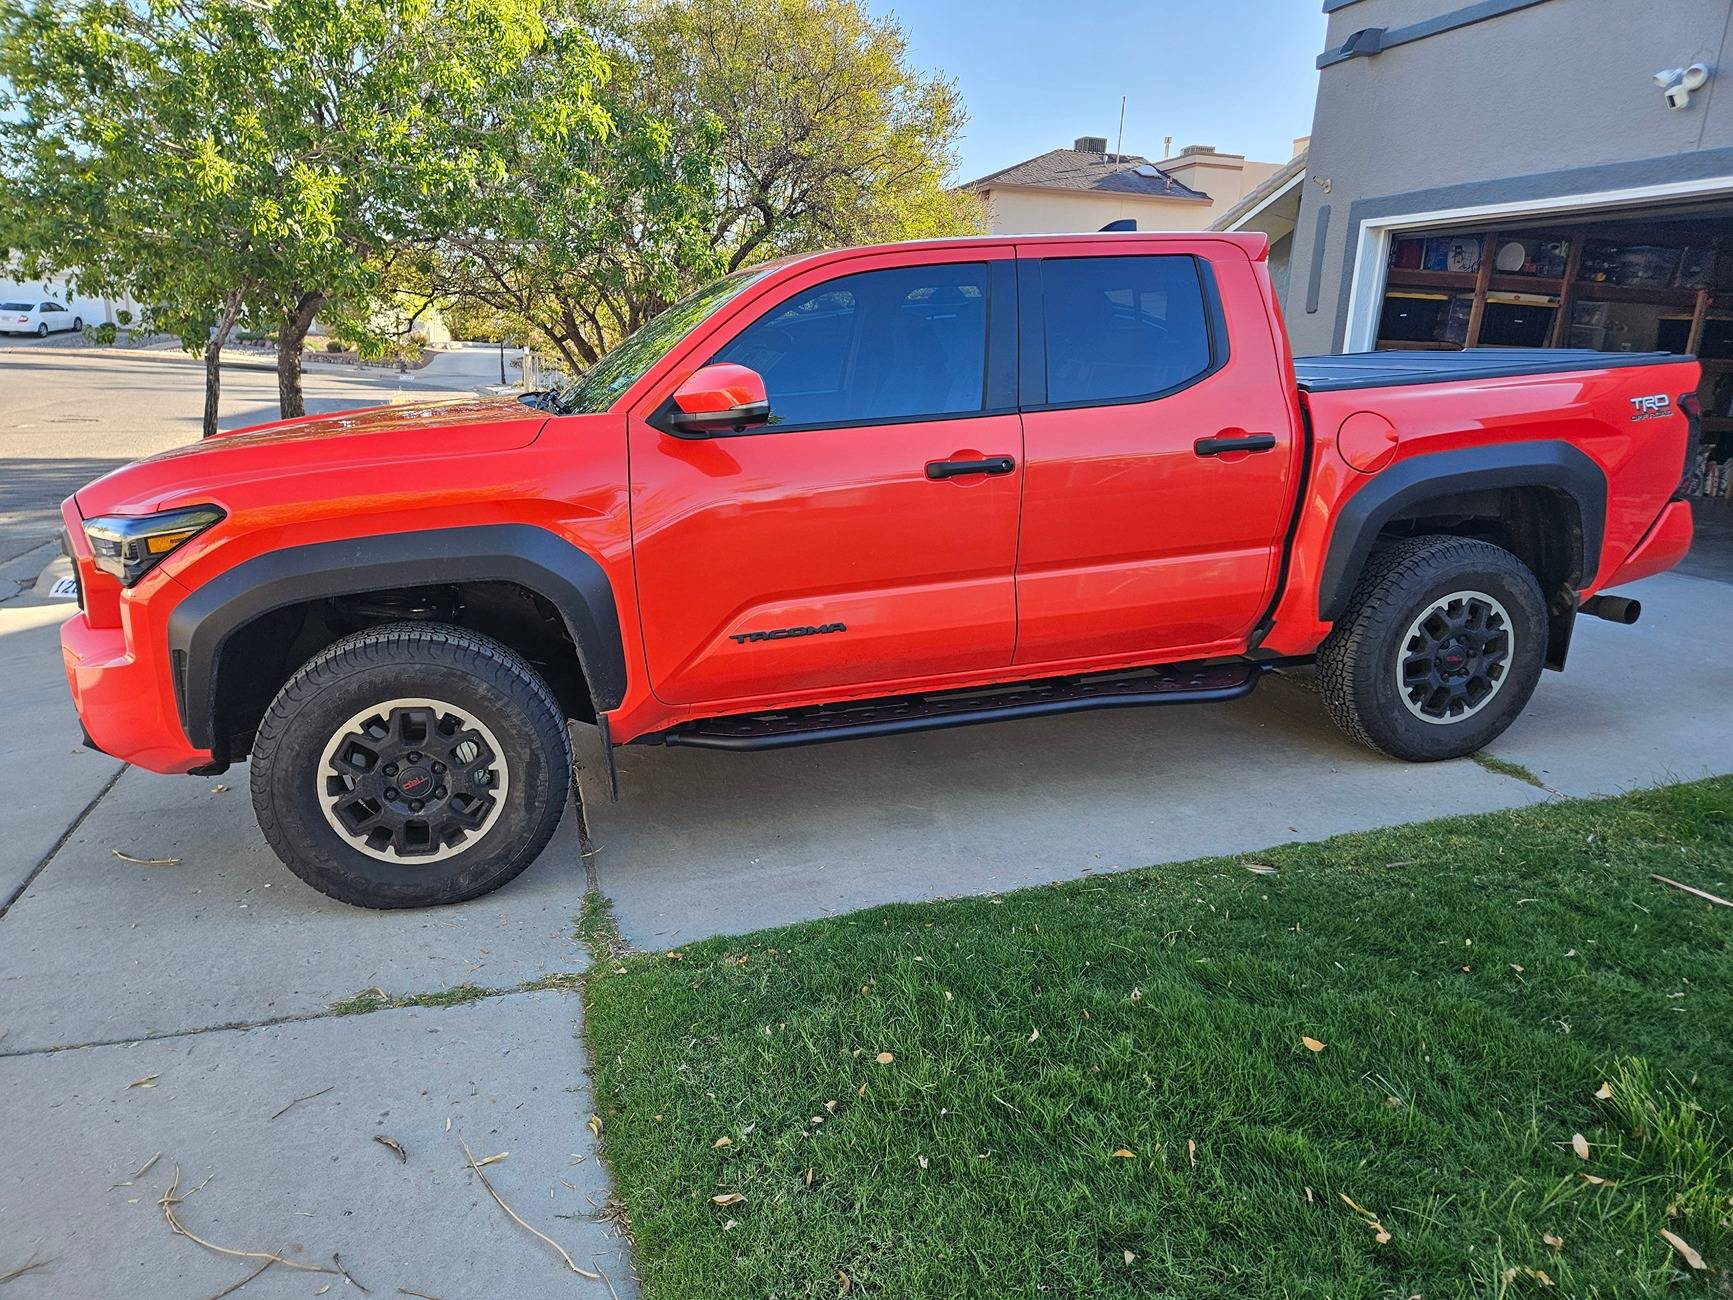
Overall, yes, it was a tough project. Yes, it is disappointing that everything wasn't perfect. It was very rewarding to do it myself, and I'm super happy with how they turned out. These things are nice! Compared to the "Predator" steps I had on my gen 3 (I absolutely hated those things!), these are not only better steps, but actually functional as underside cab protection. Additionally, we know how vulnerable those rear fenders are to rocks being flung back out of the front tires, and these look like they'll do a decent job protecting from that as well. I am concerned about the missing bracket, and I'm hoping that I either made a dumb mistake, they'll send me the correct bracket, or they'll help me figure out some way to get this issue resolved without having to take them off! If you've read this far, I hope you found some of this information useful. It probably also means you're either about to install your own set or are at least thinking about it. Please don't let my trials here discourage you from reaching out to them. That is not my intention at all. There are probably other options available now, like the OEM sliders, but these sliders are sharp looking. For the cost though, I definitely feel like a decent set of instructions should be included, and they need to work out the bugs. Thanks again for reading!
I bought my truck back in May and almost immediately went shopping around for rock sliders. I wanted something that would function as side steps and added protection. There were very few options at the time, but the Cali Raised sliders seemed to fit the bill nicely, so I pulled the trigger on them. About 9 weeks after ordering them, they were delivered. The sliders came very well packed, and after opening and inspecting, everything appeared to be in order. As expected, there were no installation instructions to speak of. Don't bother with the installation guide on their website. No offense intended, but it's actually more confusing trying to follow those instructions than simply trying to figure it out on your own. ?
Maybe they will update their installation guide soon? 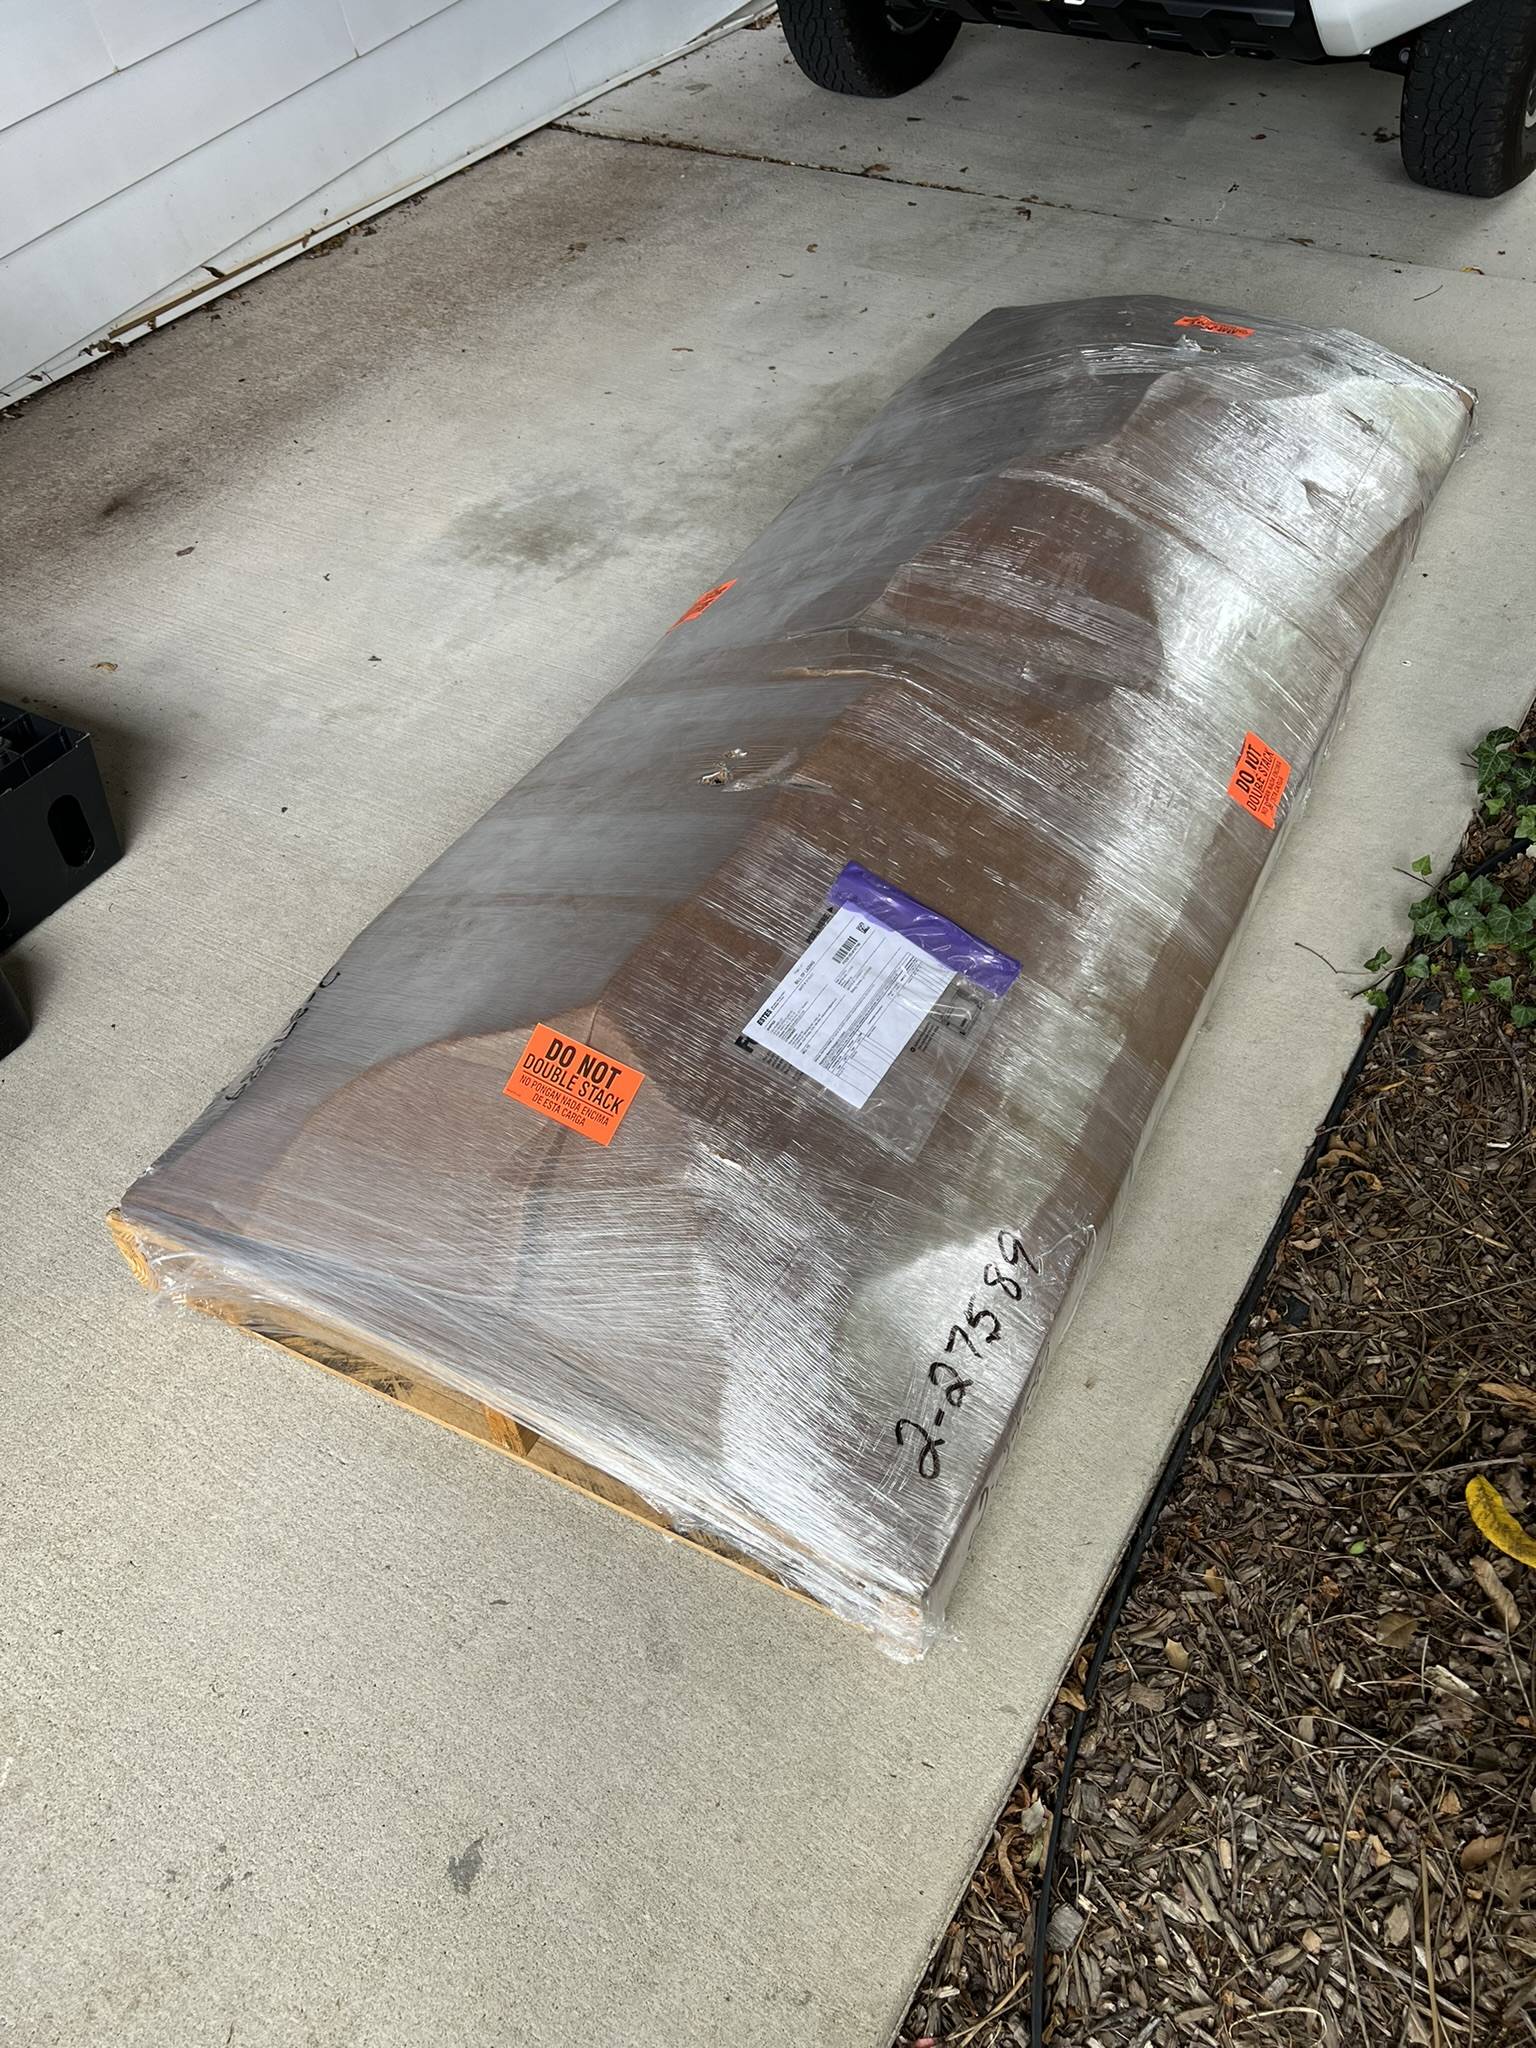
I watched and studied the install video from Cali Raised about a dozen or more times, and noticed a few things. The hardware that I had received with my kit looked different (no big deal) and the quantities of my nuts and bolts was different (slightly concerning, but I was confident that I had enough of what I needed). The video itself was fairly helpful; although, it looked to me like the truck featured in their video is an SR5, and mine is a TRD OR (noted). Here was the hardware that came with my kit:
(4) 1/2" x 5" bolts
(2) 1/2" x 4-1/2" bolts
(5) 1/2" x 1-1/2" bolts
(20) M10 bolts
(6) M8 bolts
(11) 1/2" locking nuts
(1) 1/2" square snap-in nut (not pictured)
(more than enough) washers
I also received (5) brackets; (4) "L" shaped brackets, and (1) oddly shaped bracket *the same brackets shown in the install video, only mine were powder coated! Sorry, I didn't take pictures of the brackets out of the box. The sliders themselves were powder coated too, as I chose when I originally ordered them. All of the powder coating appeared to be very nicely done. The only other bit of hardware was a single bare-metal "spacer" bracket with a bolt hole in the center.
Here are the tools that I used:
1/2" socket wrench
12 mm socket
13 mm socket
17 mm socket
3/4" socket
Adjustable wrench
Pry tool
(I also used various other "tools" when I had to get creative while installing the sliders, but more on that in a bit LOL!
I opted to get my truck elevated as much as I could, and my driveway is at a slight incline. Fortunately, I had some ramps, and of course, wheel chocks (safety first!!!) that I use for doing oil changes. I would definitely recommend lifting the truck a bit higher than it sits normally if you can, but also keep in mind, the higher you lift the truck, the higher you have to lift the rock sliders.
Next came the prep; also similar to the video, except for me, there were two extra items to address (all on the passenger side of the truck). The TRD OR has a skid "plate" protecting the fuel tank held on with (5) small bolts which needed a 12mm socket to remove. You might think you can work around the skid plate, but trust me, save yourself the headache and take a minute to remove it! You will also need to remove a small supporting bracket (pictured below) bolted onto the bottom of the frame exactly as shown in the video guide.
*Note: all of the OEM bolts which need to be removed require a 12mm socket, and also, the cardboard that came with the packing makes for a much nicer experience while laying on the ground. Just sayin'!

There were (2) ground wires also bolted to the side of the frame which needed to come off (again, the truck in the video only appeared to have a single ground wire. Once unbolted, I tucked them up on top of the frame to keep them out of the way. There were (12) plastic frame "plugs" which needed to be removed as well. There (3) of them on each side of the frame. I used a razor blade and my handy pry tool to pop the plugs out without damaging them (into some random drawer to be forever forgotten). The plugs sit very flush against the frame, and I used the razor blade to assist in getting the pry tool where it needed to be.
After I finished prepping the frame for the sliders, I decided to start on the passenger side as the guy in the video does. It also seemed a bit more intensive than the driver's side since there was more hardware to be concerned with. Obviously, I would need something to help hold the slider in place while installing the bolts, so I grabbed some small jack stands. The passenger side slider is the one with the extra flange for the fuel tank bracket in case it isn't easy enough to figure out.
Here's the passenger side slider propped up on the jack stands:
...and here's the driver's side:
Quickly, I realized laying there trying to prop up one side of the slider with one hand and trying to thread a stubborn bolt with a washer on it in the other hand was very difficult LOL. Not to mention, getting everything lined up correctly and close to where it needed to be. For me, a five gallon bucket came to the rescue:
Now, the flanges were much closer to where I needed them, but I still ended up using various parts of my knees, back, and shoulders to really get it lined up perfectly. Did I mention that these things have to be lined up perfectly? The bolts will not go anywhere but as far as you can throw them if you aren't almost exactly where you need to be. Thankfully, once you get one M10 bolt in, the rest become much easier (until they don't).
While installing the M10 bolts (use a 17mm socket) through each flange and into the frame, don't bother tightening them down, in fact, only get them a few turns in because if your sliders were like mine, they won't all go in anyway. This is the part where you may begin questioning your own sanity. Fortunately, I was semi-prepared for this scenario after reading another user's post on this forum regarding their experience installing these things. They wound up enlarging some of the bolt slots to make them fit, and this was not something that I was looking forward to doing on my brand-new, $1300 rock sliders! I wound up loosening bolts, tightening bolts, removing bolts, kicking, beating (with a rubber mallet, of course lol), and eventually, I was able to get all but two of the M10 bolts installed (one missing on each slider). There was simply no way to get all of the bolt holes to line up well enough, and, just like the aforementioned user, my driver side slider was even more difficult (alignment wise) than the passenger side. Maybe, if it was possible to flip the entire truck upside down, maybe they'd all line up perfectly. I will never know, in any case. I chose to settle with one missing bolt on each side of the truck (no big deal, I think). All of the OEM hardware, like the (2) ground wires and the fuel tank bracket, fit where it needed to without too much fuss.
*Note: only one, single M8 bolt (use a 13mm socket) is used, and it goes with the passenger side slider. I triple checked to make sure I wasn't missing anything LOL. Installing the additional "L" brackets with the 1/2" hardware (use a 3/4" socket and a wrench for these) was also helpful in getting the slider snug up against the frame which, in turn, helped align some of the holes for the M10 bolts).
Getting these things on required a bit of creativity. With another person, it may have been a bit easier, but I don't think a helper can make the flanges line up perfectly either unless they're exceptionally strong. Here, I used my factory supplied bottle jack to force the driver's side slider into place as best I could, as it soon became apparent that I was not physically or mentally strong enough to bend steel tubing, even slightly:
Safety first! After multiple attempts to get bolts aligned on the driver's side (I mean MULTIPLE: starting from one end and working my way down, starting over from the other direction, one bolt at each end, no bolts at either end, with the mounting brackets attached and without, and so on) this is how I got it to all but one missing M10 bolt:
I lined up the two holes on the end closest to the front tire (these bolts are inserted vertically, upside down, through the flange and into the bottom of the frame) with my jack stands and buckets. I inserted both M10 bolts at that end. I tightened them down, but not fully tight. I was a little concerned about the flange bending here because this appears to be the weakest point of an otherwise incredibly stout chunk of steel. Rather than working my way down from there, I went to the opposite end of the slider and pushed up and in (towards the cab of the truck) as hard as I could to see if the holes were even close to lining up... they weren't. Before I pulled out all my hair, I remembered the bottle jack behind the back seat. I figured, screw it, I've tried everything else. You can see in the picture below where I placed the jack in relation to the rest of the slider. As I started raising the jack, I realized it was looking like my genius was starting to pay off! Slowly but surely, one of the holes appeared to be lined up, and then another. Sadly, of the three M10 bolts meant for the rear-side flange, only two made it home. Just like on the passenger side, it seemed impossible to get them all lined up. At this point, I was okay with leaving one out of each slider. I was not going to break out the Dremel and start shaving bits of flange #1 because I was not going to take either slider off again, and #2 there's like a billion bolts! What's one on each side? The bottle jack was embedded in the 2 x 4 pretty good, but it held. The slider didn't budge a millimeter after the jack was taken out. Here's what it looked like with all but one of the M10 bolts installed on the driver's side:

Now, about those brackets I mentioned earlier...
There are (2) brackets for the passenger side, and (3) for the driver's side. The passenger side slider was supposed to take one "L" shaped bracket and the oddly shaped bracket with the square, snap-nut. The remaining three "L" brackets were used on the driver side slider.
Each of the "L" shaped brackets installed easily enough; however, the oddly shaped bracket which mounts directly next to the fuel tank appeared to be built backwards. I rewatched the installation video about 20 more times at the extremely brief part where he very easily installs this particular bracket, and there was no way for me to line it up correctly, and I did try everything! The bare-metal "spacer" bracket... yeah, I have no idea where or how it was intended to be used, but the guy in the video put it somewhere (it looked like he used it on the passenger side), and I couldn't figure out if I was an idiot, or if maybe it just wasn't needed. Oh well! Cali Raised isn't open for questions on the weekend, so I wasn't able to find an actual answer. I will try to reach out to them during the week to see if I'll be okay with the two missing M10 bolts and the bracket.
Here is the hardware that I was left with once I had finished installing the sliders:
Notice how the "oddly" shaped bracket has a flange at the bottom where the lower 1/2" bolt should attach to the slider. I believe that flange should be facing the opposite direction for the bracket to fit flush against the frame. You can put the snap-nut on the other side of the bracket, but then there is no way to install the nut and washer onto the bolt through bottom flange. You can also see the bare-metal spacer bracket here.
...And here are some pictures of the installed rock sliders:
So you can see the "step"-action going on:

I had to run into work for an emergency immediately after I had just finished installing the passenger side slider LOL. Yes, I know my truck is dirty... it gets dirty!
Overall, yes, it was a tough project. Yes, it is disappointing that everything wasn't perfect. It was very rewarding to do it myself, and I'm super happy with how they turned out. These things are nice! Compared to the "Predator" steps I had on my gen 3 (I absolutely hated those things!), these are not only better steps, but actually functional as underside cab protection. Additionally, we know how vulnerable those rear fenders are to rocks being flung back out of the front tires, and these look like they'll do a decent job protecting from that as well. I am concerned about the missing bracket, and I'm hoping that I either made a dumb mistake, they'll send me the correct bracket, or they'll help me figure out some way to get this issue resolved without having to take them off! If you've read this far, I hope you found some of this information useful. It probably also means you're either about to install your own set or are at least thinking about it. Please don't let my trials here discourage you from reaching out to them. That is not my intention at all. There are probably other options available now, like the OEM sliders, but these sliders are sharp looking. For the cost though, I definitely feel like a decent set of instructions should be included, and they need to work out the bugs. Thanks again for reading!

Sponsored